Fan Service
Housekeeping
- Get my custom service from my github
- For quick plugin installation and usage instructions, see the readme on the github link, above.
Introduction
As part of my home-network setup, I have RaspberryPi 4 that runs a network fileserver and a PiHole. I got the particular RaspberryPi in question as part of a retro gaming kit that came with a housing for the RaspberryPi, game controllers, etc. The housing that came with the kit included a cooling fan and for most of the time that I’ve used this setup, the fan has seemed to function normally. That is, it seemed to turn on for some amount of time at boot, then eventually turn off. I never particularly stress this system, and the fan didn’t run much, so I never thought much about the fan. Until now.
The problem
Recently, the fan has been running continually. I’ve repeatedly checked on the CPU usage on the RaspberryPi to see if some rogue process is consuming resources without my knowledge, but the CPU usage and temperature are always low. There doesn’t seem to be a good reason for the fan to be running.
Diagnosis
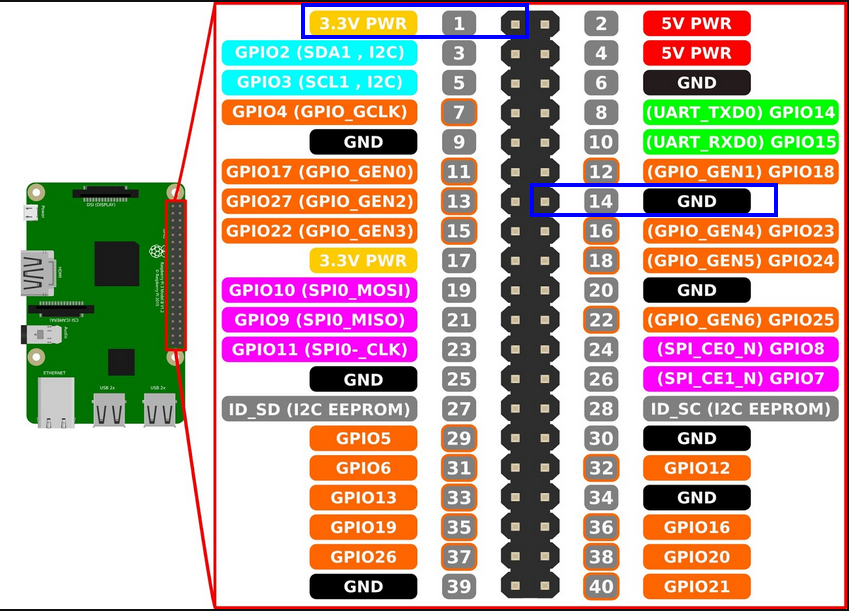
I hadn’t thought about wiring the fan since I assembled the kit a few years ago, so I opened it up to see which pins it was wired to. Despite being a 5v fan, when I opened up the casing, the fan pins were connected to the physical pin 1 (3.3V PWR) and pin 14 (gnd).
It makes sense that this would cause it to run continually (if a bit slowly due to the lower-than-designed voltage), but I have no idea why it didn’t always run contually the entire time I’ve owned it. I can’t really account for the fact that the fan used to turn on at boot and then later turn off.
The Solution
To solve this problem, I had to do 2 main things:
- Figure out how to wire to fan to the RaspberryPi (i.e. The Hardware)
- Figure out how to make the RaspberryPi control the pins that the fan was wired to (i.e. The Software)
The Hardware
First I wanted to just connect the fan from the pin 2 (5v PWR) to one of the GPIO pins and control it that way. When I drop the GPIO pin to low, current would flow from the 5v pin accross the fan, and cause it to spin, but it turns out that the GPIO pins can’t take enough current for that solution to work.
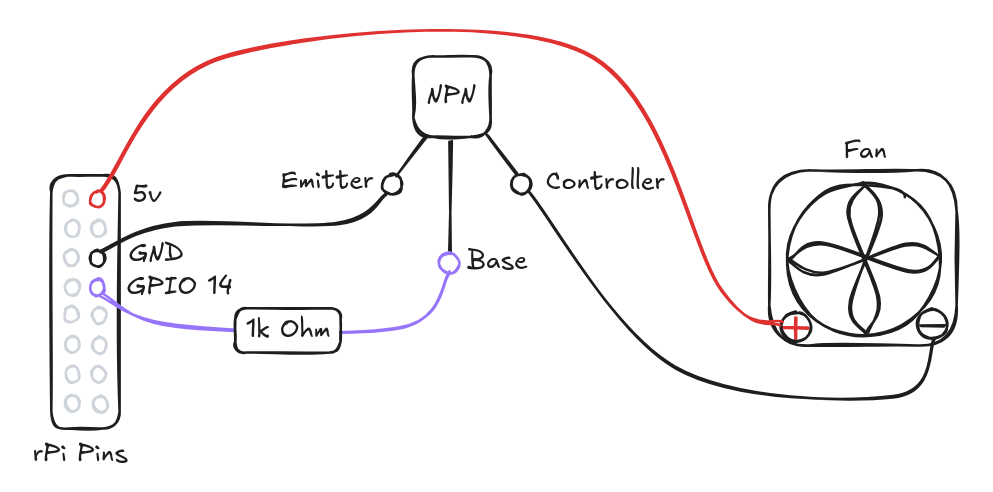
Instead, I had to create a simple circuit that uses a GPIO pin to control the current flow between the 5v pin and a ground pin. Here is a diagram of the circuit.
The components:
- RaspberryPi 4
- 5V cooling fan (Mine has serial number ED3007S1M-AP00 and this is a close match)
- NPN transistor (I had a 2N3904 leftover in a circuits kit from undergrad, which turned out to be suitable for the job)
- 1k Ohm resistor
- (optional) A diode to protect the RaspberryPi from current generated by the fan being spun by external forces
I didn’t include the diode because I didn’t have one on hand, but I plan to add one soon. If you use this solution, be careful not to dust your fan while its connected to the RaspberryPi if you do not use the diode!
I built the circuit on a breadboard before I soldered it all together just to make sure it all worked, but thats not really necessary with such a simple circuit.
The circuit:
- Connect pin 2 (5V pwr) on the RaspberryPi to the high (+) pin on the fan.
- Connect the low (-) pin on the fan to the controller pin of the NPN transistor
- Connect pin 6 (GND) on the RaspberryPi to the emitter pin of the NPN transistor
- Connect pin 8 (GPIO 14) on the RaspberryPi to the base pin on the NPN transistor
There is a commandline tool for RaspberryPi called raspi-gpio that allows you to manually control the states of the various gpio pins on the board. After you create the circuit described above, you can test the circuit with the following commands:
# set GPIO as output. Do this once
raspi-gpio set 14 op

# turn the fan on
raspi-gpio set 14 dh

# turn the fan off
raspi-gpio set 14 dl
After testing manually with the circuit on the breadboard and raspi-gpio, I soldered it all together and moved on to making it work automatically.
The Software
Since implementing the solution below, I learned that I didn’t have to try this hard, and I could have solved the problem by adding a single line to /boot/config.txt. But thats no fun anyway! It’s easy enough to implement a custom solution for a problem like this, so I came up a plan to control the fan.
The plan:
- Create a simple Python script that regularly checks the CPU temperature, turns the fan on if the temperature reaches a trigger temperature, and then turns the fan off if/when the temperature falls below a trigger temperature.
- Create a service that runs the script on boot
The Python Script
This script belongs to root and is stored in /root/scripts/fan-control.py. The script uses raspi-gpio to control the pin’s state, and vcgencmd to check CPU temperature. These are the only two abilities needed to create simple control logic for the fan. The script checks CPU temperature and makes a decesion about the fan every 5 seconds.
#!/usr/bin/env python3
import subprocess
import time
import os

GPIO_PIN = 14
ON_TEMP = 70
OFF_TEMP = 60

def set_gpio(output):
    os.system(f'raspi-gpio set {GPIO_PIN} op')
    os.system(f'raspi-gpio set {GPIO_PIN} {"dh" if output == 0 else "dl"}')

def get_temp():
    out = subprocess.check_output(['vcgencmd', 'measure_temp'])
    temp_str = out.decode().split('=')[1].split("'")[0]
    return float(temp_str)

fan_on = False

while True:
    temp = get_temp()
    if temp >= ON_TEMP and not fan_on:
        set_gpio(0)
        fan_on = True
    elif temp <= OFF_TEMP and fan_on:
        set_gpio(1)
        fan_on = False
    time.sleep(5)
If implementing this solution yourself, you must make the script executable, atleast by root, with:
chmod 754 /root/scripts/fan-control.py
The Service
The service, like other services, is stored in /etc/systemd/system/fan-control.service
Here is the content of the service:
[Unit]
Description=Raspberry Pi Fan Controller
After=multi-user.target

[Service]
ExecStart=/usr/bin/python3 /root/scripts/fan-control.py
Restart=always

[Install]
WantedBy=multi-user.target
Making it work
To start the service and make sure that it starts at boot, you can use the following commands
sudo systemctl daemon-reload
sudo systemctl enable fan-control
sudo systemctl start fan-control
Testing
After implementing the circuit and the service described above, the fan briefly turned on at boot, then turned off. I wanted to test it to see if it would really come on at 70C and turn off at 60C. I only have SSH access to the RaspberryPi so I needed a oneliner to stress the CPU and report the temp to me at the same time. I used the following:
(while true; do vcgencmd measure_temp; sleep 3; done) & for i in {1..4}; do sha1sum /dev/zero & done
Basically this reports temperature on the commandline every 3 seconds and also calculates the sha1 hash of infinite zeros 4 times. All this will do is chew up CPU and ram until it is stopped, which I can manually do by inputting CTRL+C, then:
killall sha1sum; kill %1
After stressing the CPU with this test, I found that the fan did, in fact, turn on at 70C as expected and turned off at 60C when I stopped the CPU stressing.
Conclusion
This was a fun exercise for me since I have not had much experience implementing solutions like this, i.e. building small control cicuits & logic that actually solve a problem. This project was very simple, but it has made me want to pursue similar projects and add other hardware devices to to RaspberryPi or other minicomputers that I own.
Thanks for reading! If you have any questions or comments, feel free to reach out or follow me on X
Enjoy Reading This Article?
Here are some more articles you might like to read next: