HTB Write-Up | Hard Sherlock | Latus
Introduction
This is a write-up for Hack The Box’s Sherlock challenge Latus, which is rated as Hard. It was relatively difficult, as reflected by the fact that I was only the 42nd person to solve it after it had been out for several months. For context, an easy Sherlock that I did a write-up for had something like 75 solves the day after it came out and now, a few months later, it has over 1000 solves.
That being said, I think this is a great challenge and I would encourage anyone to jump into a challenge like this one. I think diving in a little over your head in digital forensics is a fantastic way to learn and expose yourself to new topics.
For this demo I’m using one machine running Fedora 40 and one running Windows 11 depending on the tools I need to access different information.
The Scenario
As always with CTFs, let’s start by carefully reading the scenario description to see what we are working with.
“Our customer discovered illegal RDP sessions without Privileged Access Management (PAM) in their system on June 28. They collected evidence on a server they suspected was an intermediary server to move laterally to others. Even though the attacker deleted the event log, I believe the few remaining artifacts are enough to help confirm the attack flow and trace the attacker’s behavior.”
What do we learn here?
- The initial malicious activity that was noted were RDP sessions, giving us a protocol to focus on.
- The activity we are interested in was discovered on June 28th, so we should start with evidence that fits that timeframe.
- The customer suspects that the target server was being used as a pivot host, implying it wasn’t the attacker’s ultimate objective.
- The event logs have been deleted, so we will be working with other types of forensic evidence, not logs.
The Evidence
Now let’s take a look at the evidence. If you are having trouble with the basics like downloading and decompressing the evidence, take a look at the beginning of this other post where I describe how to do that.
After decompressing the evidence, we’re left with a single file: evidence.ad1

Full transparency, even after completing the entire CDSA course from HTB and completing a masters degree in cybersecurity, I had not heard of .ad1 files. In fact, I double checked the CDSA course to make sure I hadn’t missed it and “.ad1” doesn’t come up in a search of the materials on HTB Academy.
Nothing that a quick google search can’t fix though. It turns out that .ad1 is an extension used for a proprietary format, similar to a container according to DIFR Science. No need to get into the nitty gritty here, but it should suffice to say that it is a type of forensic image and we will need some specific software to be able to interact with it.
To open evidence.ad1 we will need to use FTK Imager, which can be found in Exterro’s downloads section. It needs to be installed on Windows. You could probably run it on Linux via Wine, but for simplicity’s sake, I just booted up a windows system and installed it there.
Once you open up FTK Imager, just file -> Add Evidence Item. In the pop-up window, select Image File -> next, then browse to wherever you evidence.ad1 and click finish. Expand the tabs on the left-hand side to see the image contents. It should look like this upon loading in correctly.
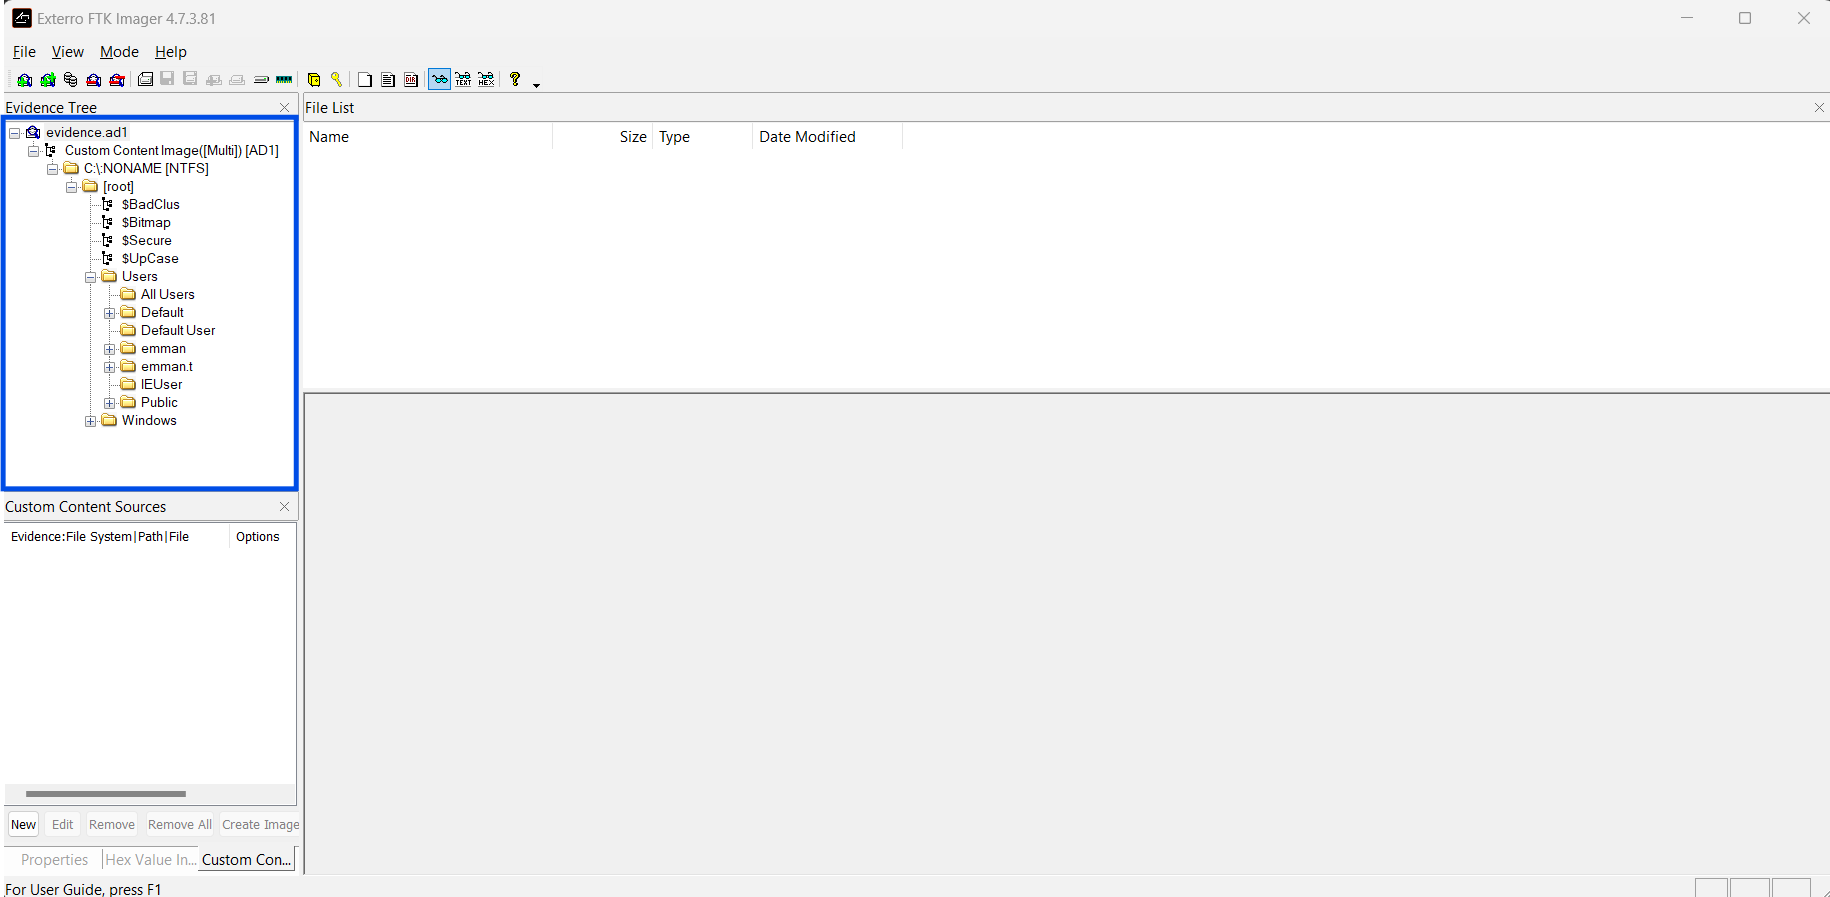
From here, it’s possible to browse the contents of the image to some extent and export certain files if closer examination is necessary. We are ready to hop into Task 1.
Task 1: When was the last failed logon attempt using emman.t user? (UTC)
Normally, this would be where I reach for Windows Security logs and look for Event ID 4625s, but as the description said, the attackers deleted the logs. I checked the logs nonetheless just to make sure. While there actually are a few entries in the logs on the forensic image, there is nothing there to answer this question.
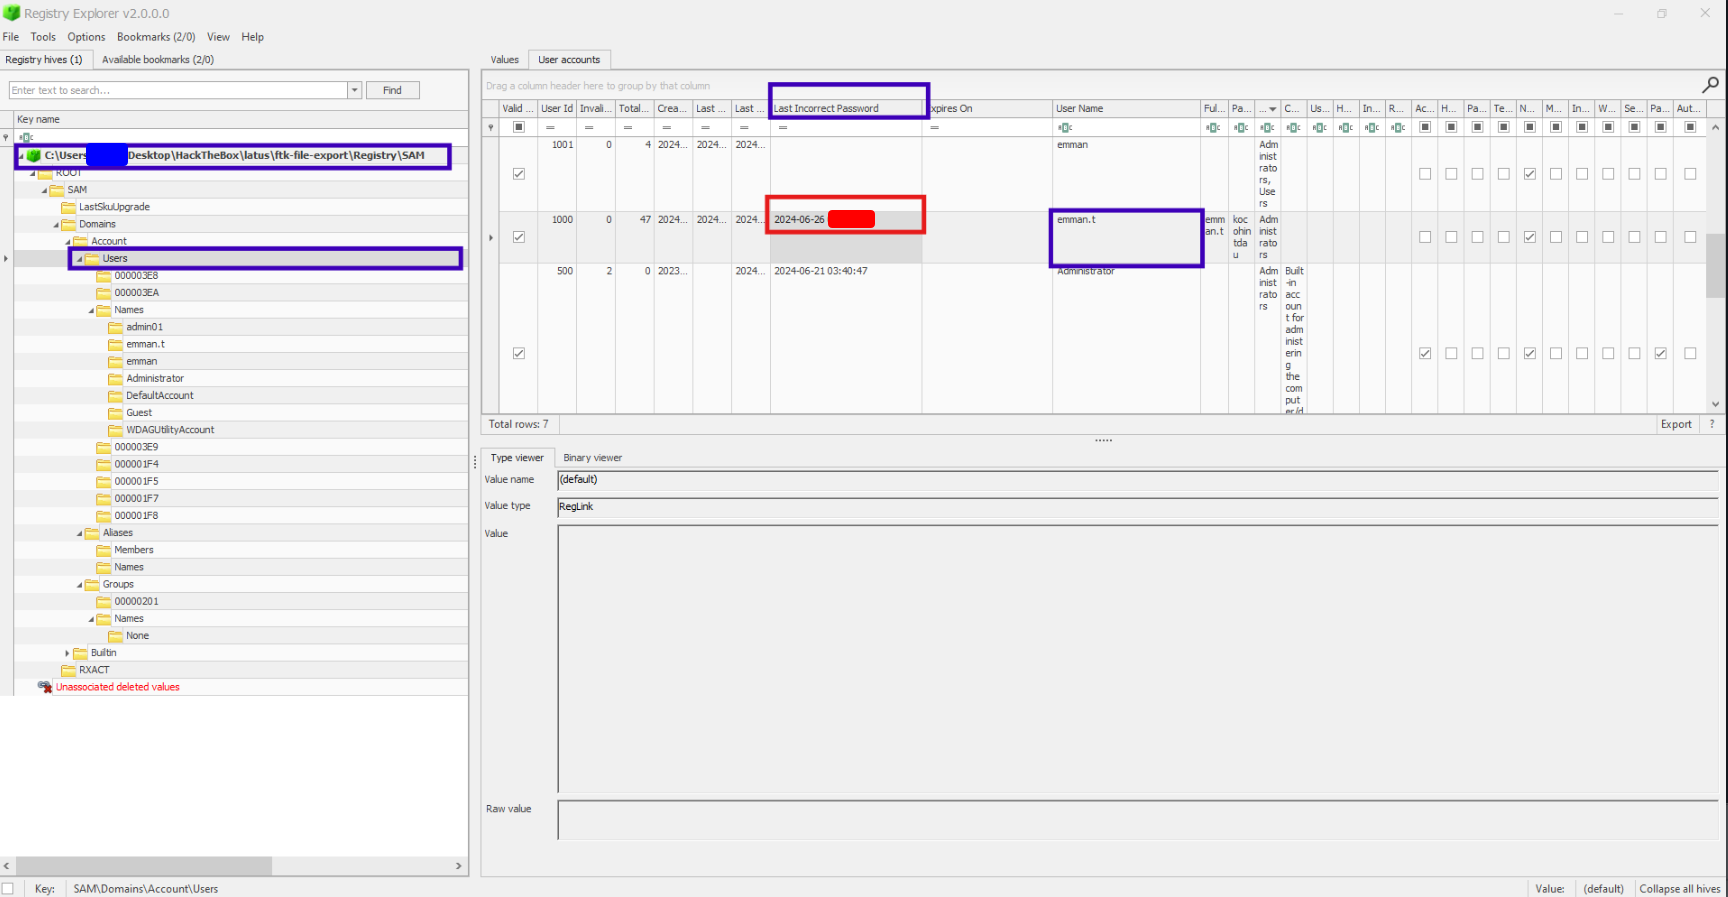
Okay, so where else might there be evidence of failed logons? The SAM (Security Account Manager) Hive in the registry holds information related to accounts, including a limited amount of their logon activity. I exported the SAM hive like this:

It is also worth exporting the SAM.LOG1 and SAM.lOG2 files from the same directory as they store transaction information for the SAM hive and can allow us to see, for example, registry keys and values that have been deleted.
Then I opened it using the Registry Explorer from Eric Zimmerman’s (EZ) EZ-Tools suite. If you don’t have them, I’d recommend just using his script provided in the Get-ZimmermanTools.zip that is available on his github pages site.
I loaded the SAM hive into Registry Explorer, then poked around a bit. At first I wasted some time searching through paths to information about individual users, but the answer turned out to be in a more obvious spot–directly in SAM\Domains\Accounts\Users.
Task 2: What are the first 3 IP addresses that emman.t connected to using Remote Desktop (RDP)?
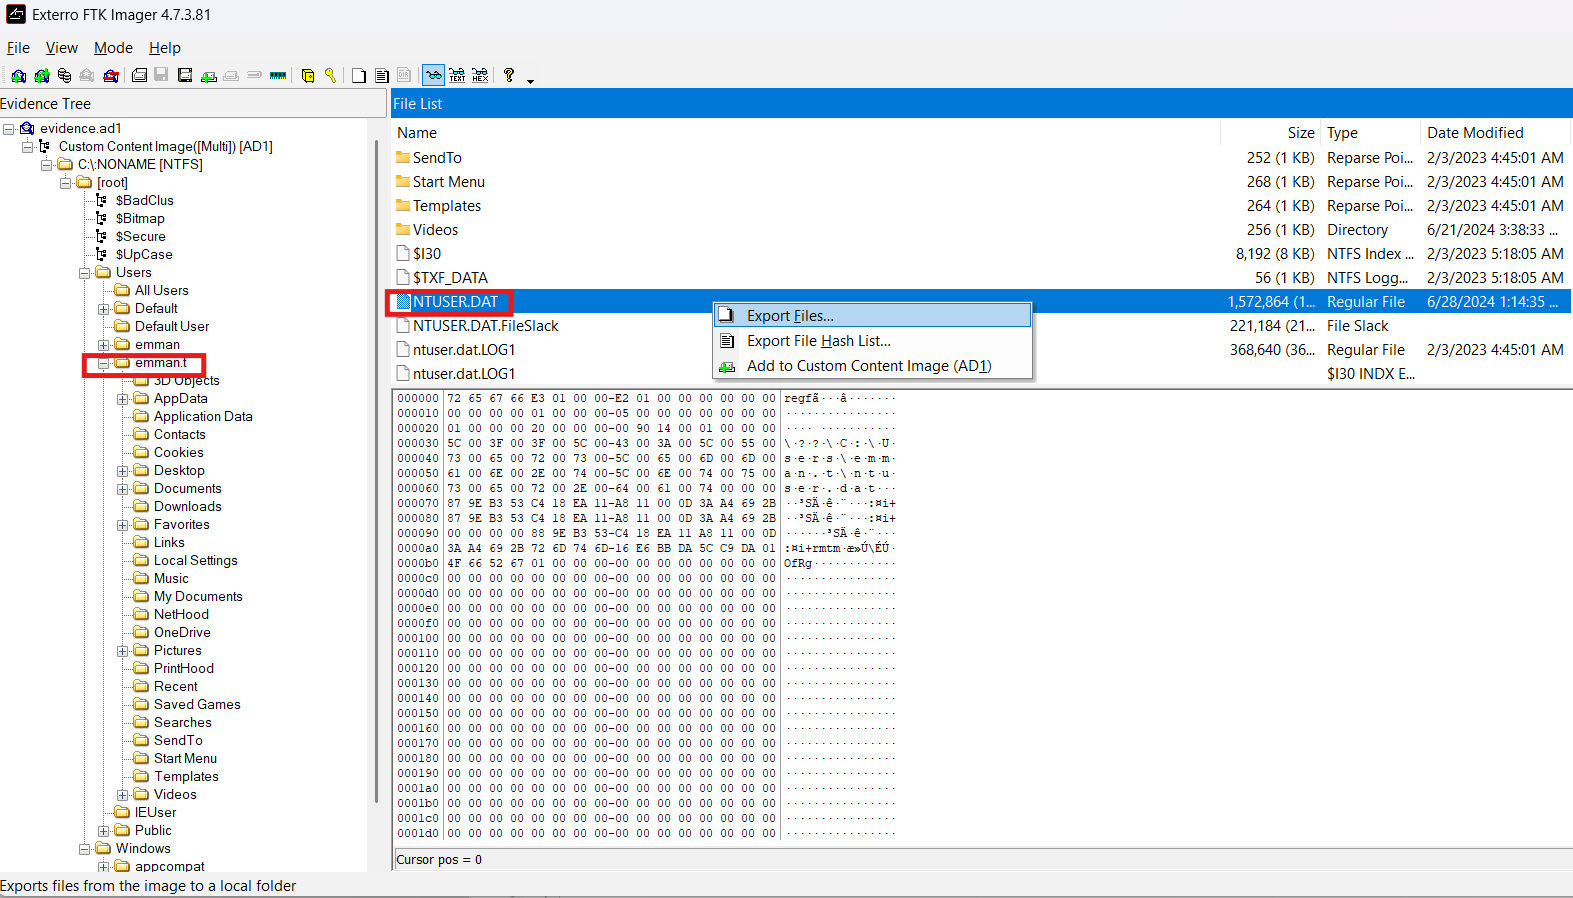
Sticking with the registry, RDP information in the registry is stored under the name Terminal Server Client. I first looked in the SOFTWARE Hive to no avail. However, it turned out that the information I was after was stored in **emman.t**’s personal hive, NTUSER.DAT. Each user has such a hive located in their home directory to store personal registry items.
Note about the <hive>.LOG1 & <hive>.LOG2 files: When you load a hive, Registry Explorer should prompt you if you need to use the log files to replay the transaction history. If it prompts you, just go ahead and do it and save the new “clean” version too for later use. It will also ask you if you want to view the “dirty” version of the hive. You really don’t have to unless you specifically want to compare before and after the transaction logs replay. Just view the “clean” versions most of the time.
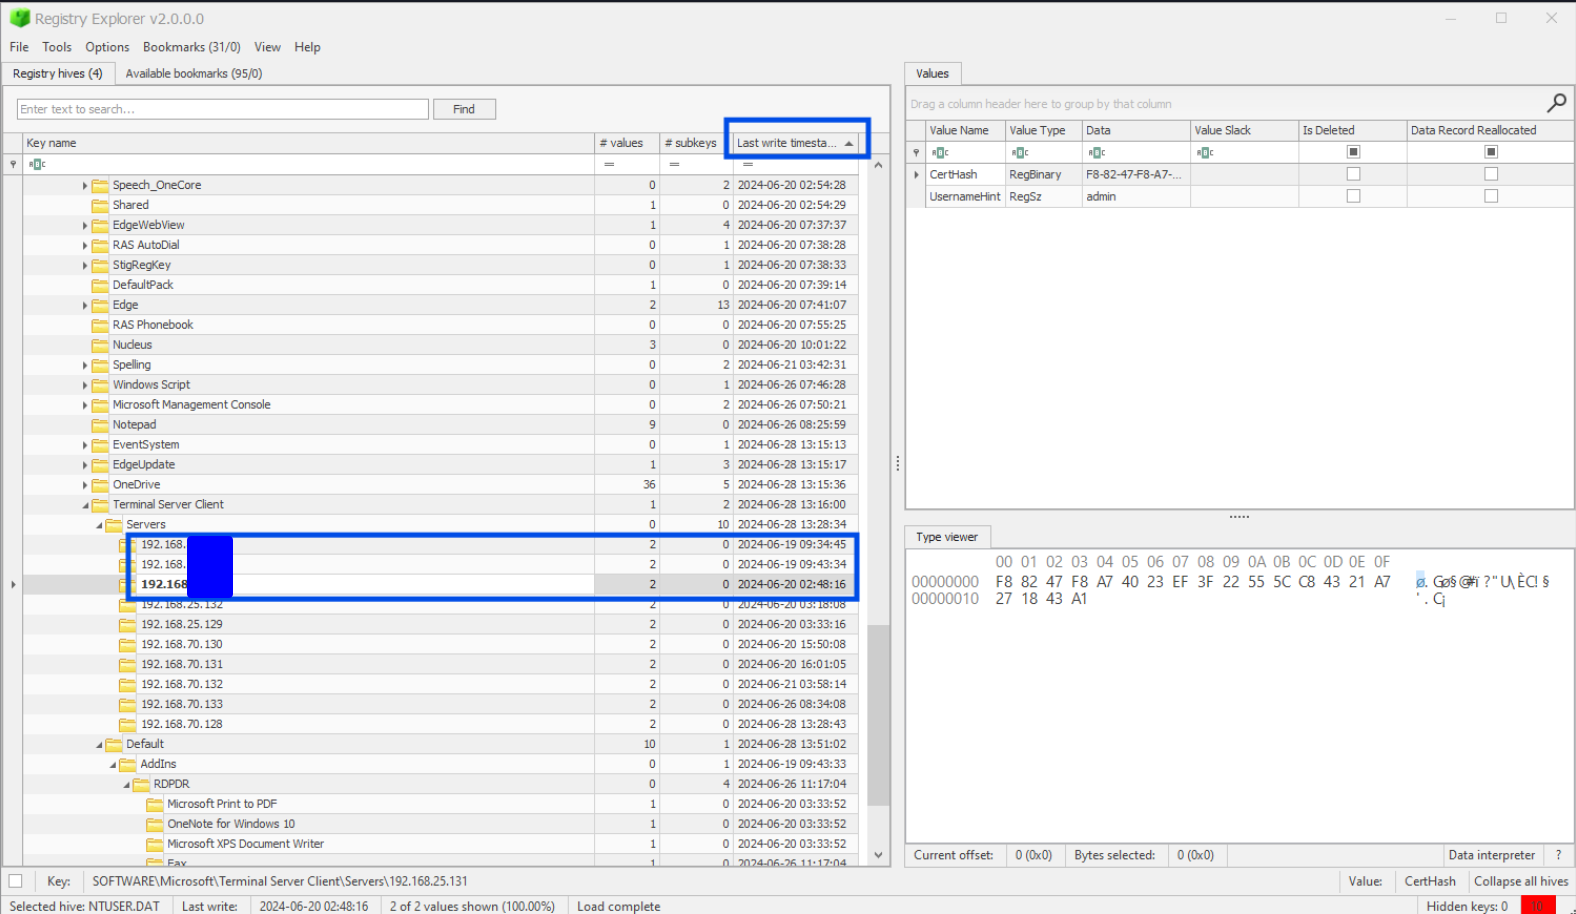
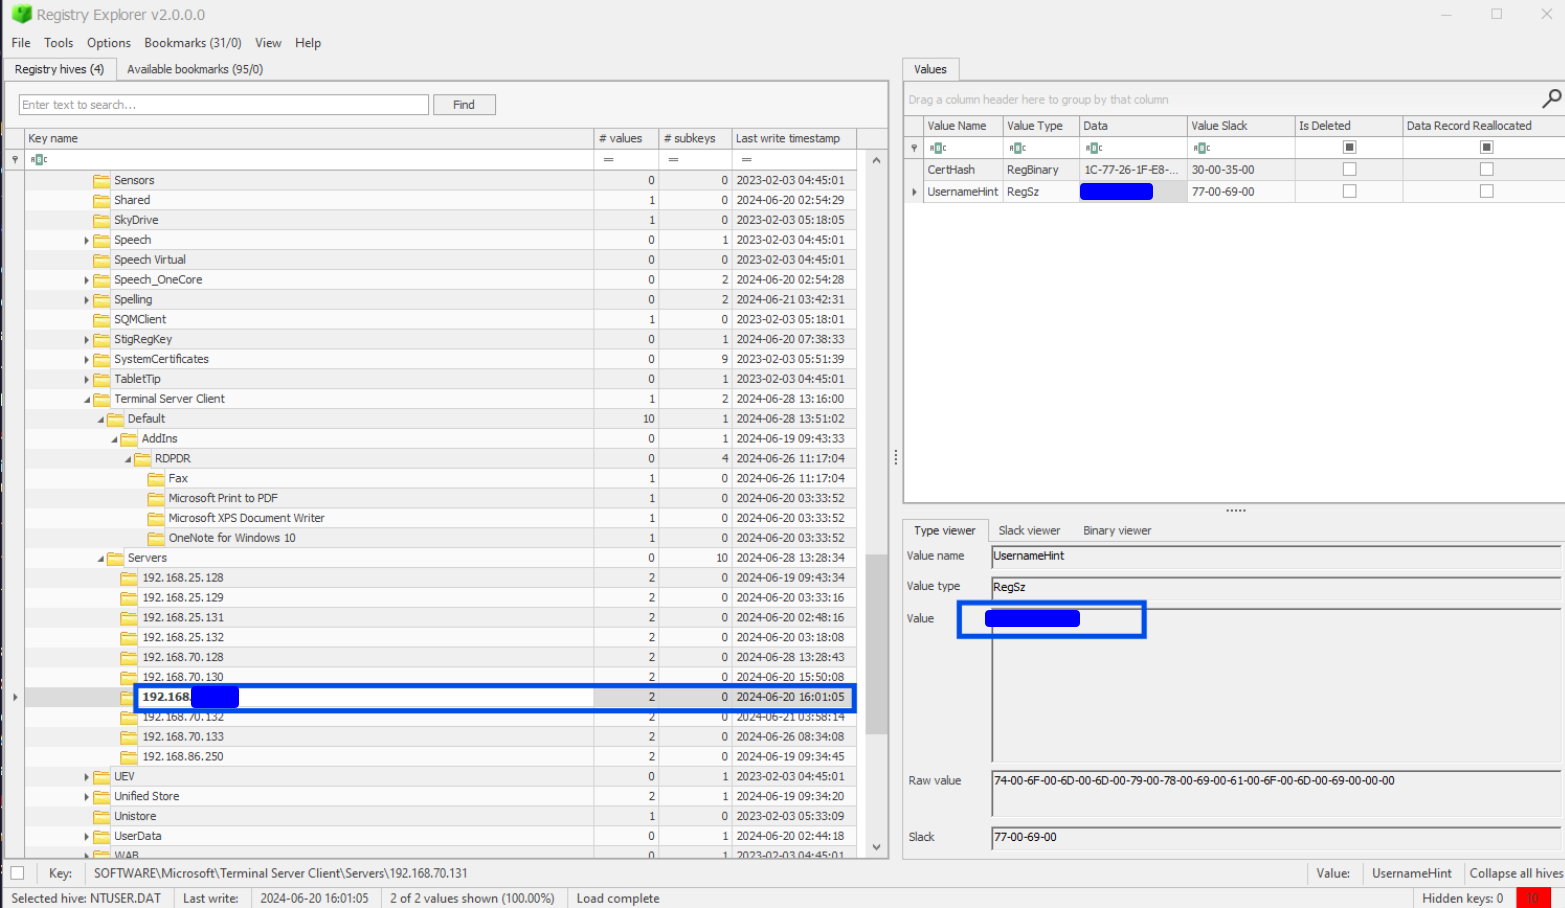
After loading it into Registry Explorer as before, we can see the locate Terminal Server Client at NTUSER.DAT/SOFTWARE/Microsoft/Terminal Server Client. I found the IPs listed in the Server key. There are a lot of times, so it’s useful here to just sort by time and take the earliest three.
Task 3: What is the destination username used to remote desktop to for the first time on 2024-06-20 16:01:05 UTC?
Another RDP question and we’re already in the right place! Just look for the matching timestamp in the list of IPs from the last question and look at its subkeys. One of the values should jump out as looking like a username.
Task 4: What is the destination IP address of the last Remote Desktop (RDP) session?
Yet another RDP question that is answerable from this location. Sort by time in the other direction this time to see the last RDP session.
I’m not sure why the answer is the one that takes place on 2024-06-26 rather than the one that takes place on 2024-06-28, which is clearly a later time. Was this just HTB messing up or is there an explanation for this? If you know, reach out to me on X and let me know your theory.
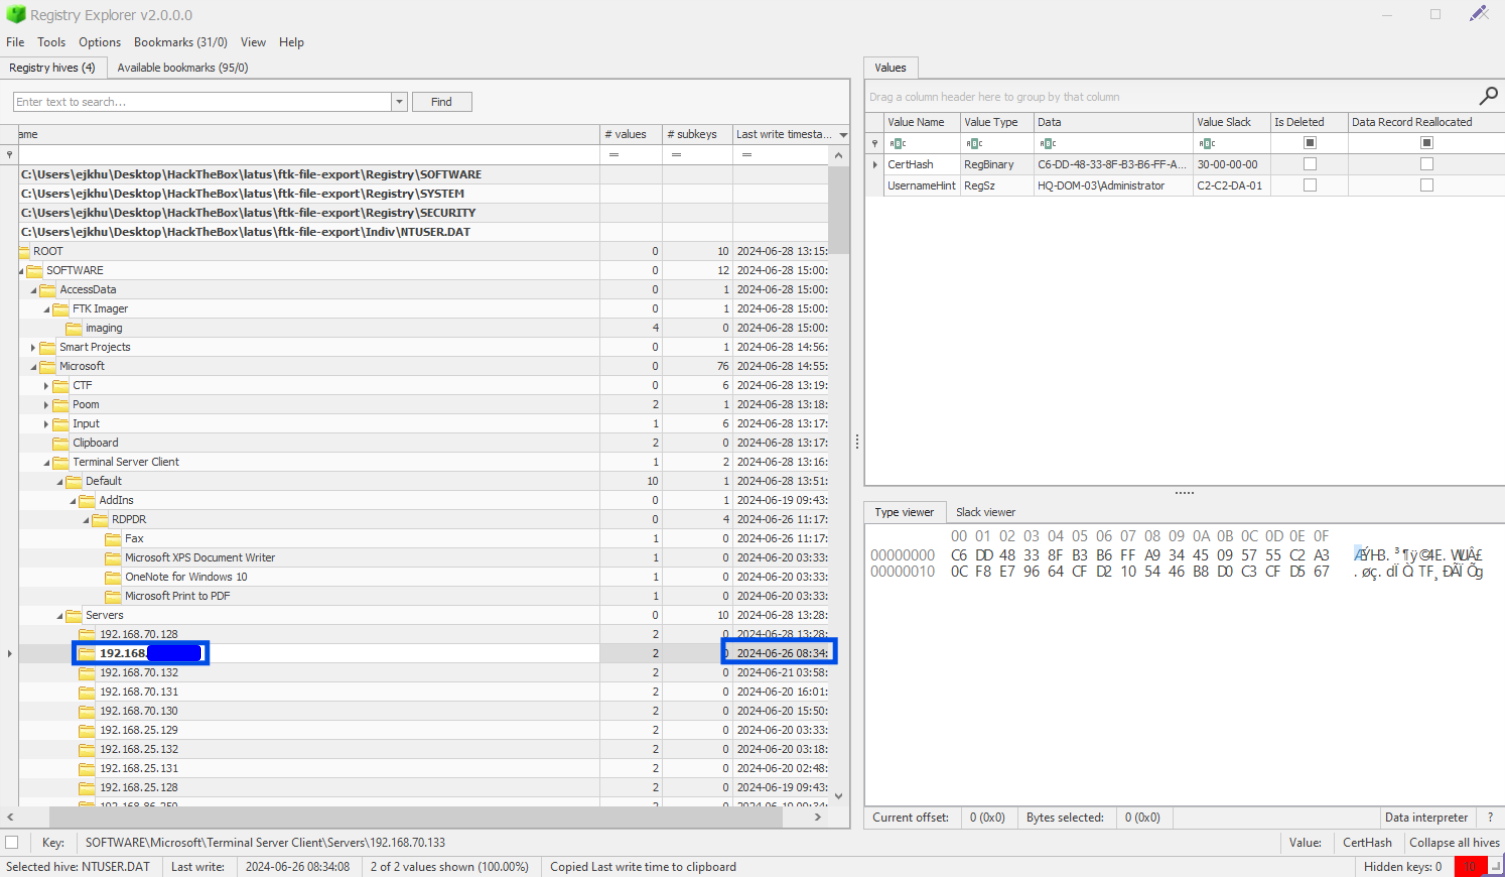
Task 5: emman.t is very careless in always saving RDP credentials to connect to other hosts, so we believe that attacker somehow leaked them. Please confirm credentials of the server with ip 192.168.70.133 that was leaked?
Man, this one threw me for a loop for the longest time. In fact, during my initial solve, this was chronologically the last Task that I solved.
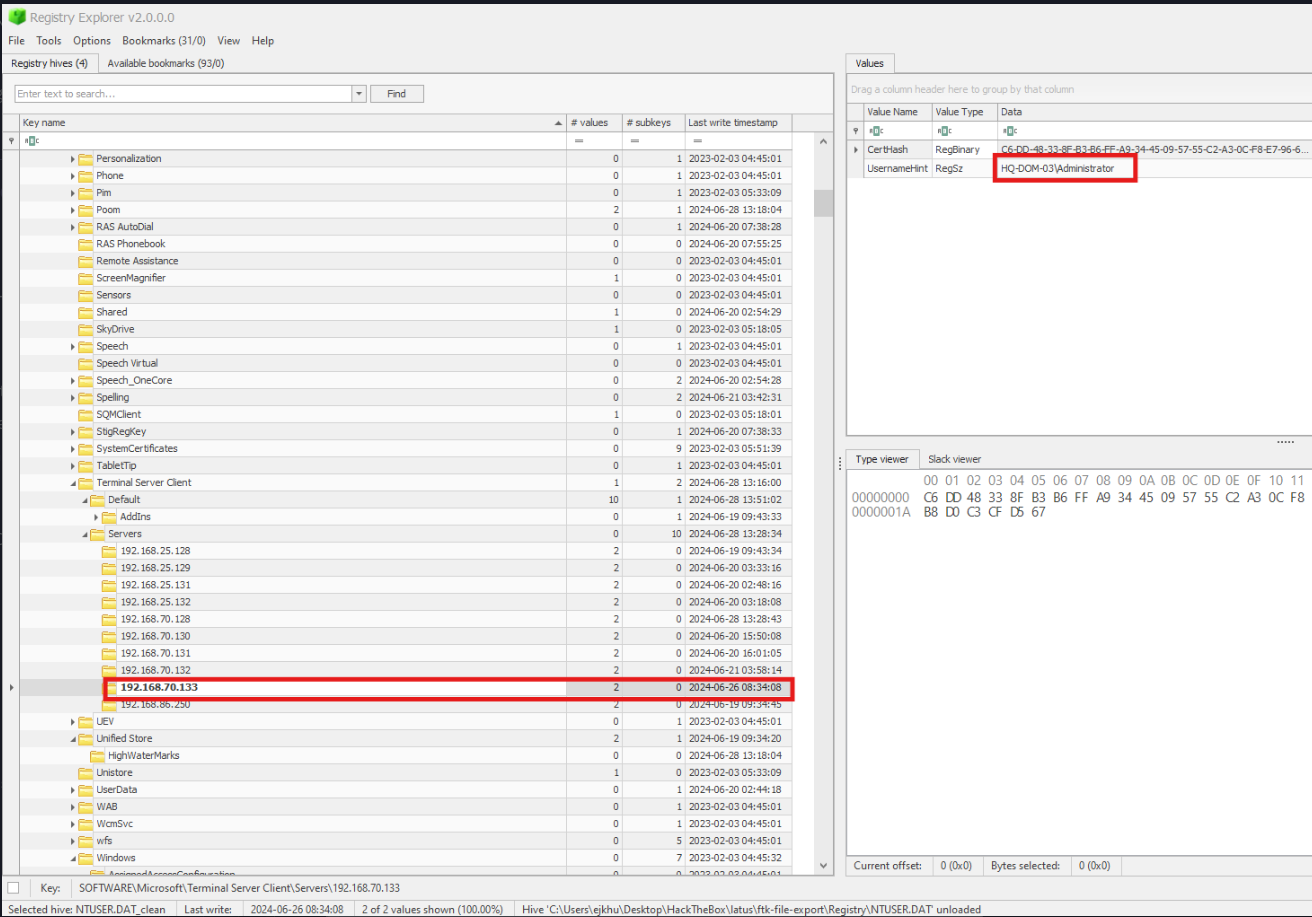
First I identified which credentials I was meant to be looking for. For that it’s back (yet again) to the **emman.t**’s Terminal Client Server key\Servers key. Examine the subkeys of 192.168.70.133 to find the username of the account the question is asking about: HQ-DOM-03\Administrator.
Even though some of the following methods didn’t lead directly to a correct answer, I’ll list a few techniques that I tried before landing on the path that worked. Not only were they worth trying, but some of them resulted in information that was important in determining how to proceed in this task and others.
Before starting this, I mass exported everything from the evidence.ad1 image and moved it back to a Linux machine so that I could more easily search through the contents of files.
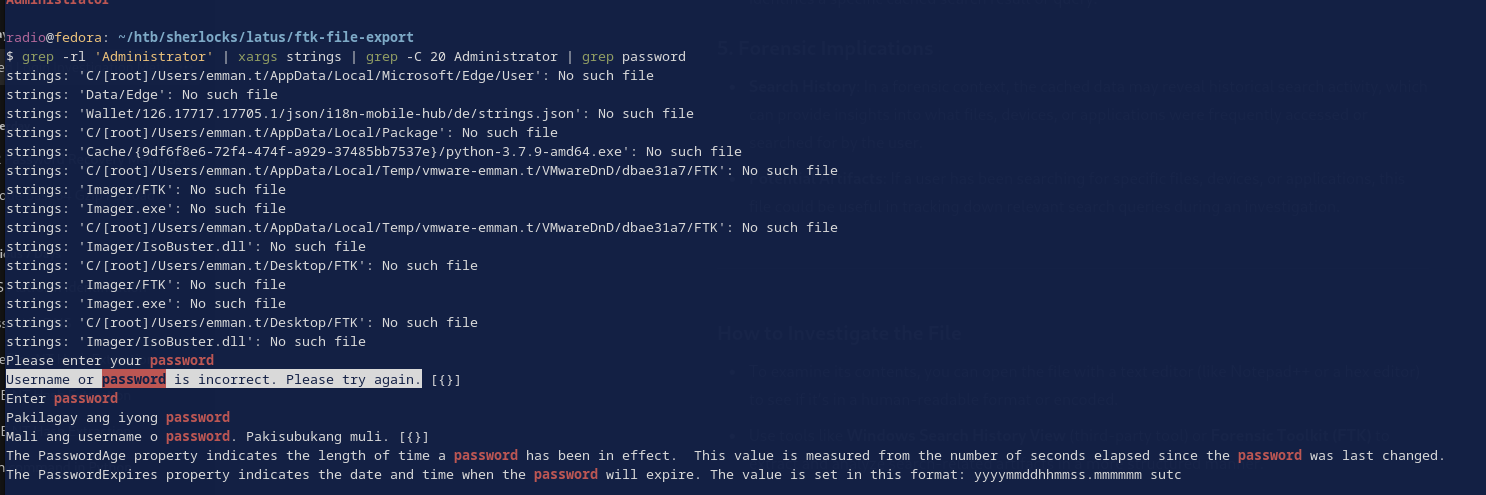
1. I used various grep and strings methods to search through the files for keywords.
Here, I grep for files that contain ‘Administrator’, then dump the strings of those files (since many were binary files), pipe the result back to grep, search for ‘Administrator’ again, returning 20 lines on either side of a match, and then search for instances of ‘password’ in those results. I did a bunch of variations of this type of search.
Since the question is asking about emman.t, I also spent some time filtering for that username to see where it came up in files andI ended up finding some very interesting results in consoleHost_history.txt which is a powershell log stored at:
C:\Users\<user>\AppData\Roaming\Microsoft\Windows\PowerShell\PSReadLine\ConsoleHost_history.txt
This is what it showed for user emman.t:

What the above image shows is the emman user being created with the password emman2024. That’s very interesting, but those aren’t the credentials we are asked for in this question. Still, note them for later.
While searching for “192.168.70.133”, “rdp”, “terminal client server”, “tsc”, etc. I ran across the following interesting files. They may play a part later:
- C:/Users/emman.t/Documents/Default.rdp
- C:/Users/emman/Documents/Default.rdp
- C:/Users/emman.t/AppData/Local/Microsoft/Terminal Server Client/Cache/Cache0000.bin
- C:/Users/emman.t/AppData/Local/Microsoft/Terminal Server Client/Cache/Cache0001.bin
- C:/Users/emman.t/AppData/Local/Microsoft/Terminal Server Client/Cache/Cache0002.bin
2. I ran secrectsdump.py (a part of Impacket) to dump credentials from the registry
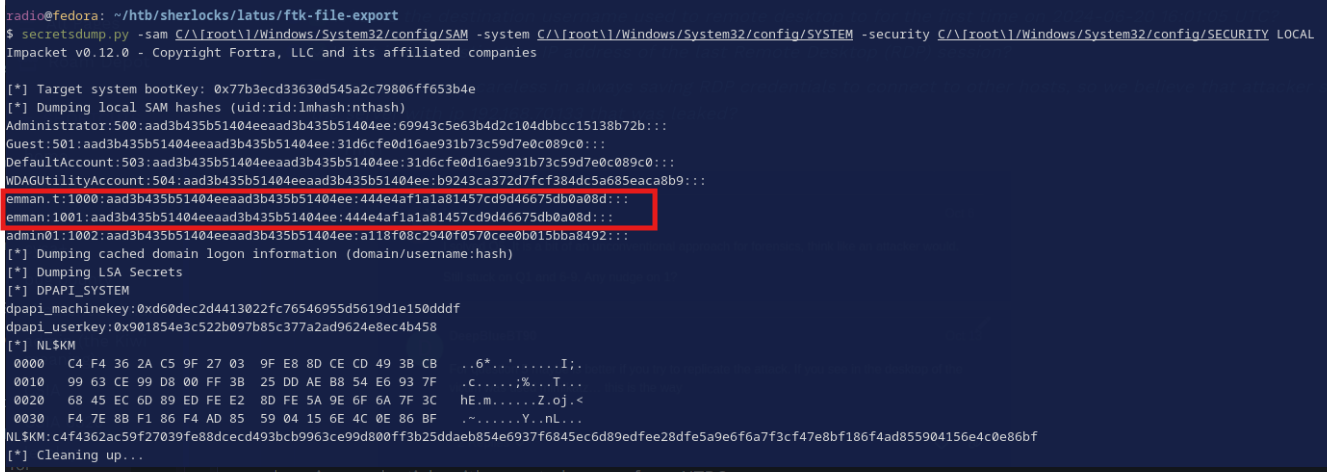
Even though we can’t directly see the passwords, we can still glean some information. The LM hashes all have an empty value, indicating that LM hashing is disabled. This is good from a defensive point of view because LM hashes are very weak and vulnerable to brute force or rainbow table attacks. More importantly though we can see the emman and emman.t have the exact same NT hash, meaning that their passwords are the same as each other. Since we know emman’s password is emman2024, we now know that must be emman.t’s password as well.
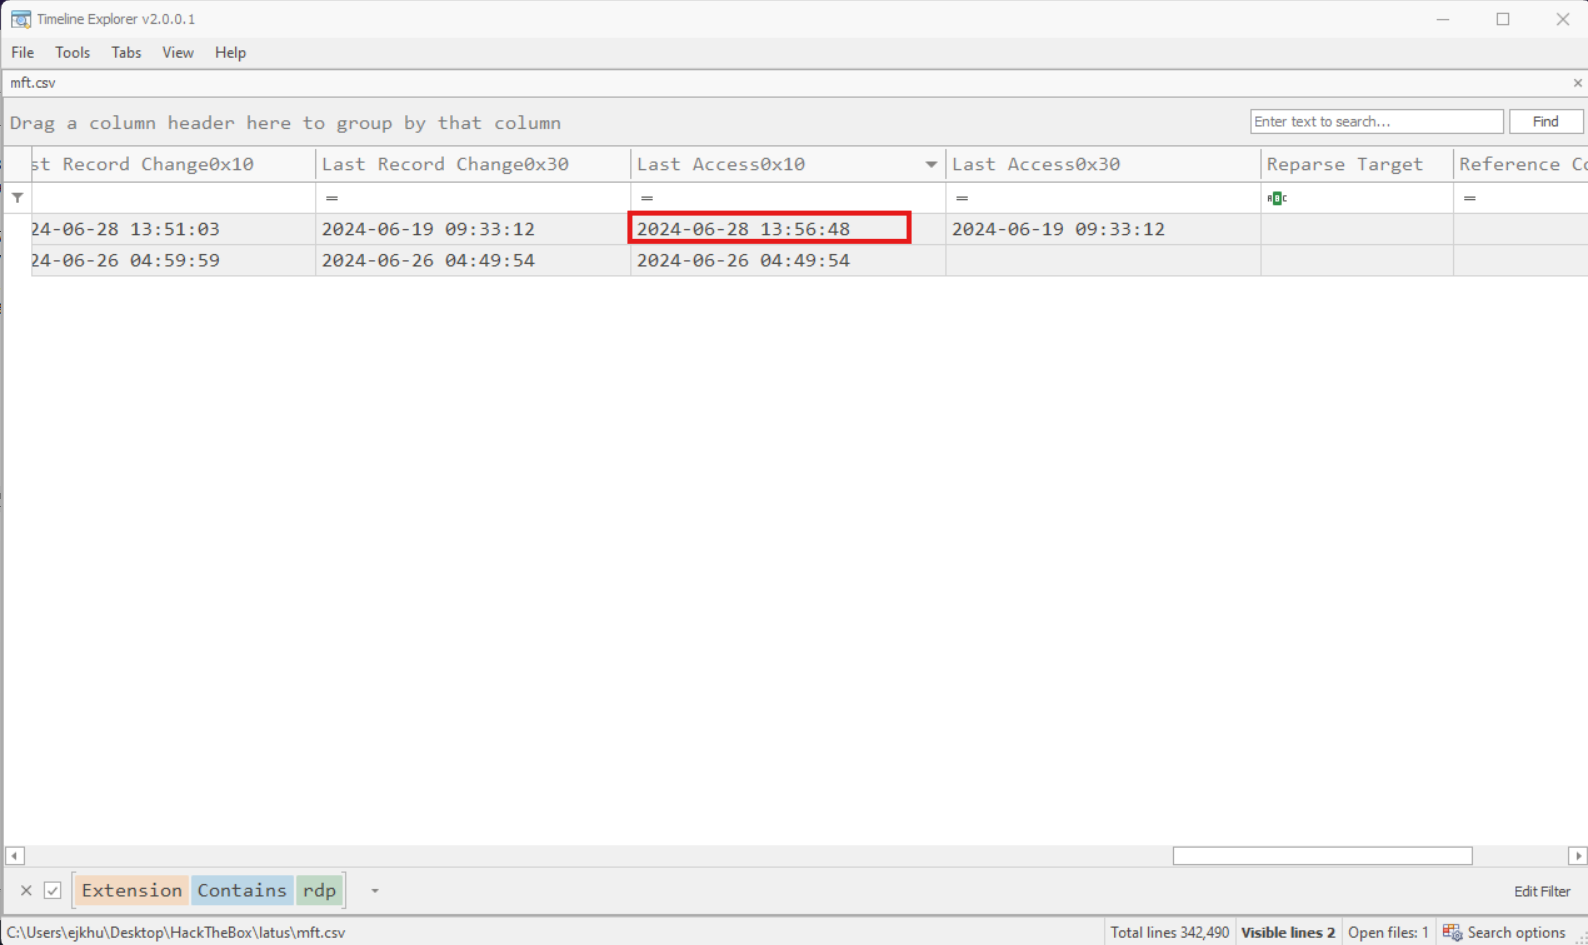
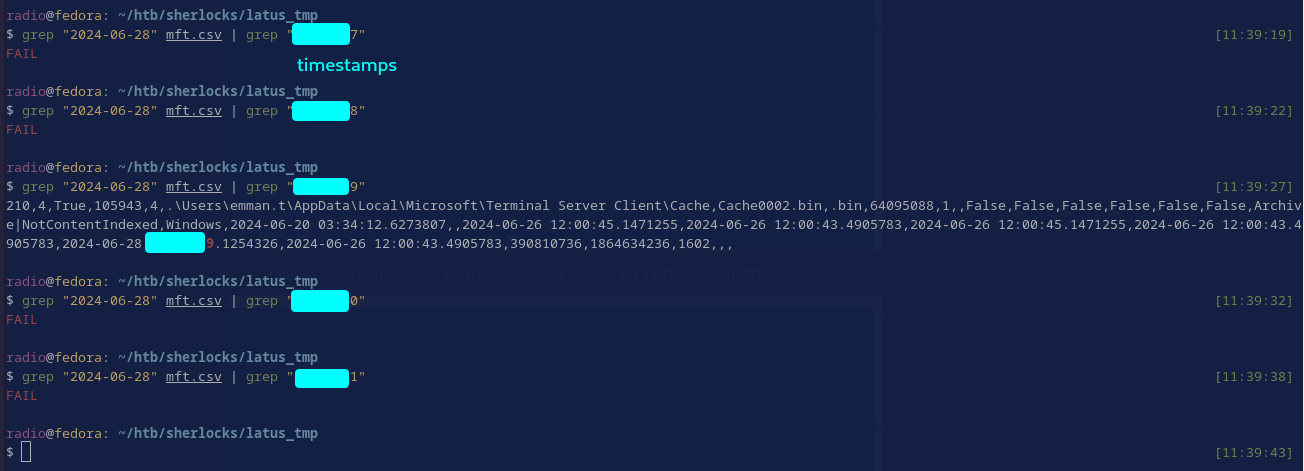
3. I looked in the $MFT to see which files were accessed around the time of the last session with 192.168.70.133
The Master File Table (MFT) stores file metadata and EZ-Tools includes some tools that make the MFT easy to parse. The MFT can contain evidence all on its own, but I often find myself using it as a quick way to query the file system to see if different files exist, where they reside on the filesystem, or when they were last edited or accessed. For this purpose I use EZ’s Timeline Explorer
First, you need to create a .csv file from the $MFT using EZ’s MFTECmd.exe like this:
.\MFTECmd.exe -f 'C:\Users\<user>\Desktop\HackTheBox\latus\ftk-file-export\C___NONAME [NTFS]\C\$MFT' --csv C:\Users\<user>\Desktop\HackTheBox\latus\ --csvf mft.csv
Make sure to replace the paths with your own.
Next, open the new .csv file up in EZ’s Timeline Explorer. Now we have a timeline showing when all the files were last edited, accessed, etc., but what time are we interested in? Specifically, we are interested in the time around the last RDP session with 192.168.70.133. We actually already know that time from the first screenshot in this Task (Task 5). The record about the session was written to the registry at time 2024-06-26 08:34:08.
Our hypothesis is that around this time credentials must have been accessed somehow to initiate the session, so if we can identify which files were accessed at this time, we should be able to narrow down the possible locations of the credentials.
Navigating near 2024-06-26 08:34:08 in Timeline Explorer, I noticed some files with ‘credentials’ in their path. Time correlated credential access. Interesting.

A credential was cached on the system just seconds before the record on 192.168.70.133 was written to the registry. It is a pretty good bet that this file will contain the credential we are looking for. It’s just a matter of finding a way to decrypt the credential file’s contents.
4. Finally, I researched the credential type, extracted it using Mimikatz, and finished the Task
DPAPI is the Data Protection API and is responsible for encrypting and storing credentials that need to be cached for each user. It’s been a while since I learned about DPAPI, so I read up on it and how to extract credentials from DPAPI-encrypted files on HackTricks among other sources. This excellent post by Will Schroeder of SpecterOps really gave me what I needed to tackle the rest of this Task.
Here is what I learned: Credential files each store a single credential and are encrypted using the user’s password regardless of the credential they store. That’s good news for two reasons. First, it means that the credential file that is time-correlated with the RDP session likely holds only the credential we are looking for. Second, we already have the user’s password. Remember? This credential is associated with emman.t. We found emman’s password in consoleHost_history.txt and then later noticed that his NT hash matched emman.t’s, revealing his password. We have the encrypted credential file, we have emman.t’s encrypted master key files, and we have the password that should decrypt the master keys. Let’s get hacking.
It turns out that Mimikatz has the ability to dump the credentials from a DPAPI-encrypted credential. Extracting it felt a bit complicated at first but it really is not too bad once it’s broken down. Accessing the password stored in the credential file requires a DPAPI master key. Accessing the DPAPI master key requires the password of the user for whom the credential file was made (i.e. emman.t), not the user whose credentials are store in the credential file (i.e. HQ-DOM-03\Administrator). The layers of encryption look something like this:
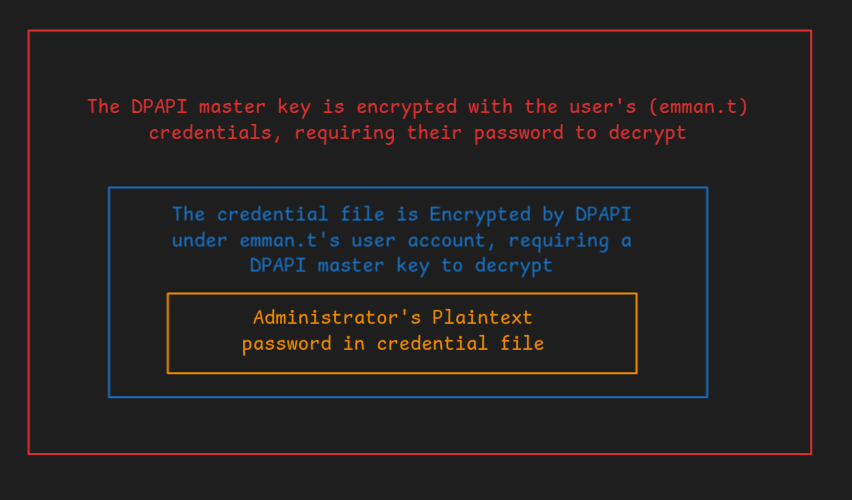
We already know emman.t’s password, so we can decrypt the master key, and if we can do that, then we should be able to decrypt the credential file.
Windows Credential Manager cached credentials are stored here:
C:\Users\<user>\AppData\Local\Microsoft\Credentials\
The one we are interested in (identified by timestamp in the MFT) is this one:
C:\Users\emman.t\AppData\Local\Microsoft\Credentials\063D7EF36287654137F1E552FF79E61E
DPAPI keys are cached here:
C:\Users\<user>\AppData\Roaming\Microsoft\Protect\<user SID>\
Identify the DPAPI master key
We don’t know which one we need yet, but Mimikatz will help us identify the correct one. Run the Mimikatz CLI on the machine where you have stored the files dumped from the forensic image. Use the following command (as always, remember to adjust the paths for your environment):
dpapi::cred /in:"C:\<path to files from forensic image>\C\Root\Users\emman.t\AppData\Local\Microsoft\Credentials\063D7EF36287654137F1E552FF79E61E"
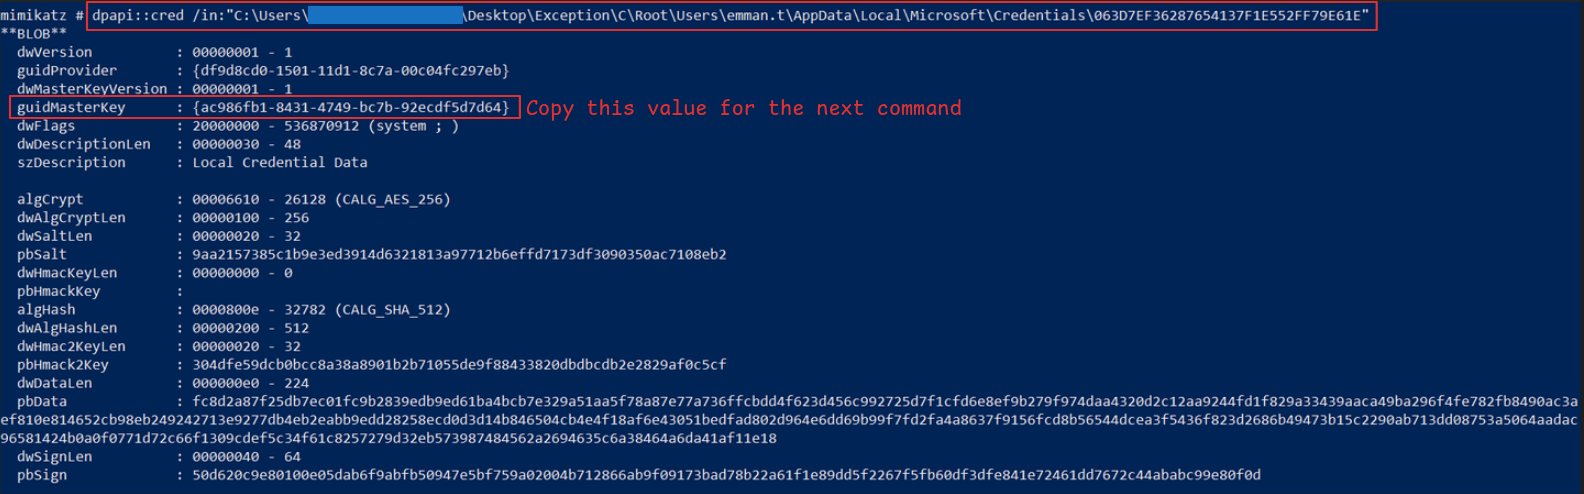
We can identify the master key that we care about from the output:
C\root\Users\emman.t\AppData\Roaming\Microsoft\Protect\S-1-5-21-1281496067-1440983016-2272511217-1000\ac986fb1-8431-4749-bc7b-92ecdf5d7d64
Dump the master key
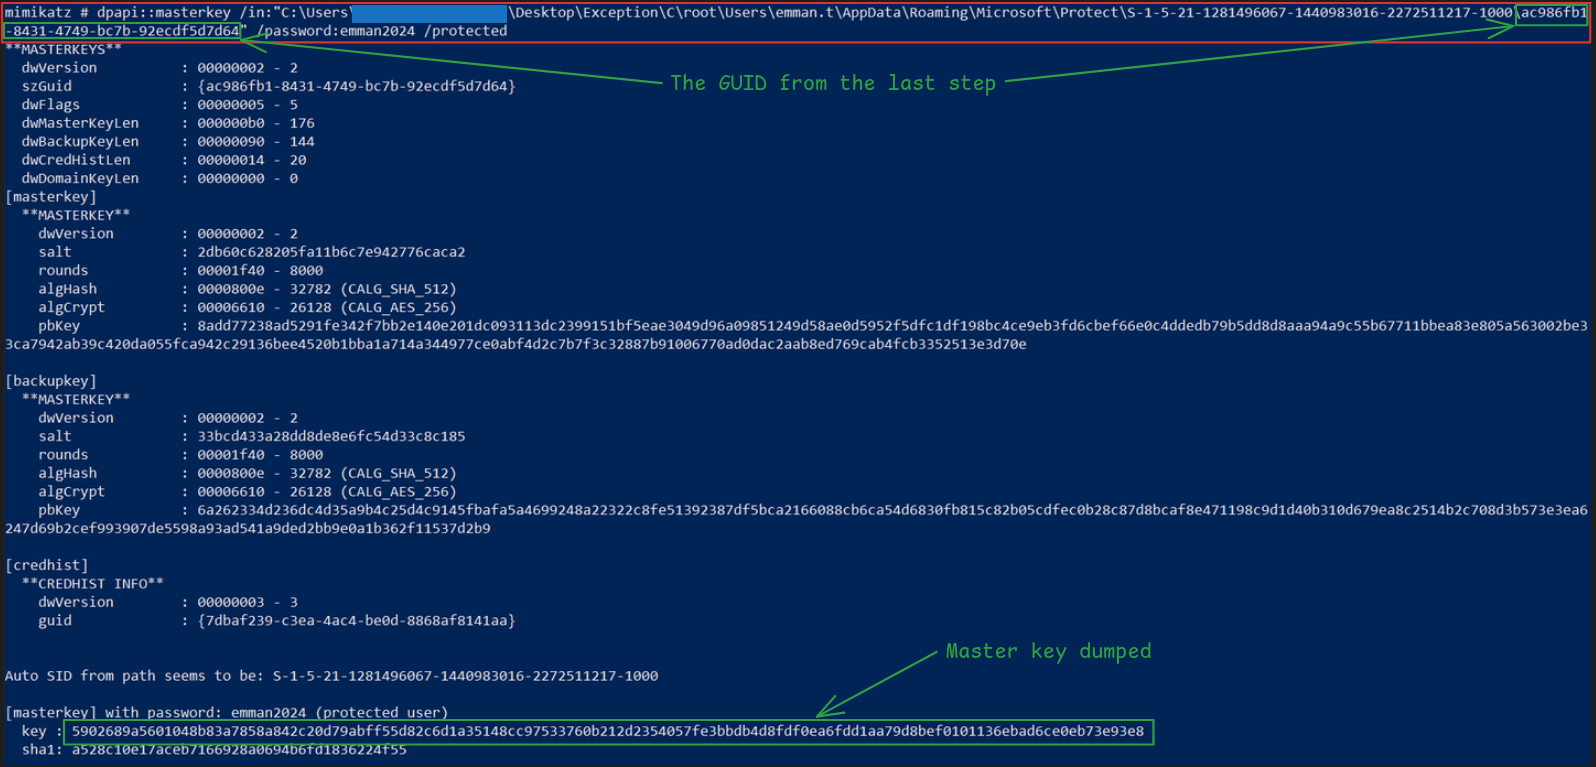
Still in Mimikatz, dump the master key using the following command:
dpapi::masterkey /in:"C:\<path to files from forensic image>\C\root\Users\emman.t\AppData\Roaming\Microsoft\Protect\S-1-5-21-1281496067-1440983016-2272511217-1000\ac986fb1-8431-4749-bc7b-92ecdf5d7d64" /password:emman2024 /protected
Dump the credential file
Mimikatz is pretty smart, so it caches the master key in memory and will just apply it to other times you run dpapi::cred within the same session, so you can just rerun:
dpapi::cred /in:"C:\<path to files from forensic image>\C\Root\Users\emman.t\AppData\Local\Microsoft\Credentials\063D7EF36287654137F1E552FF79E61E"
And it should dump the credential. If you got kicked out of the session somehow or you aren’t using the CLI, the full command to dump the cred when the master key isn’t cached in memory is:
dpapi::cred /in:"C:\Users\Gloria Cuthbertson\Desktop\Exception\C\Root\Users\emman.t\AppData\Local\Microsoft\Credentials\063D7EF36287654137F1E552FF79E61E" /masterkey:5902689a5601048b83a7858a842c20d79abff55d82c6d1a35148cc97533760b212d2354057fe3bbdb4d8fdf0ea6fdd1aa79d8bef0101136ebad6ce0eb73e93e8

As shown above, the password is C@mv@0s3rv3r
Task 6: When was the last time the Remote Desktop Connection application was executed? (UTC)
For this we have to identify the final time that the RDP application was executed. Keep in mind that executing it doesn’t necessarily mean that a connection was started at that time.
The executable responsible for running RDP connections is called mstsc.exe. I threw all the files that I extracted from the forensic image into Autopsy, a powerful forensics toolkit. Autopsy has a ‘Run Programs’ section, which shows the times at which applications were executed. Sort these by name to group all the mstsc.exes, then compare them to find the latest time.
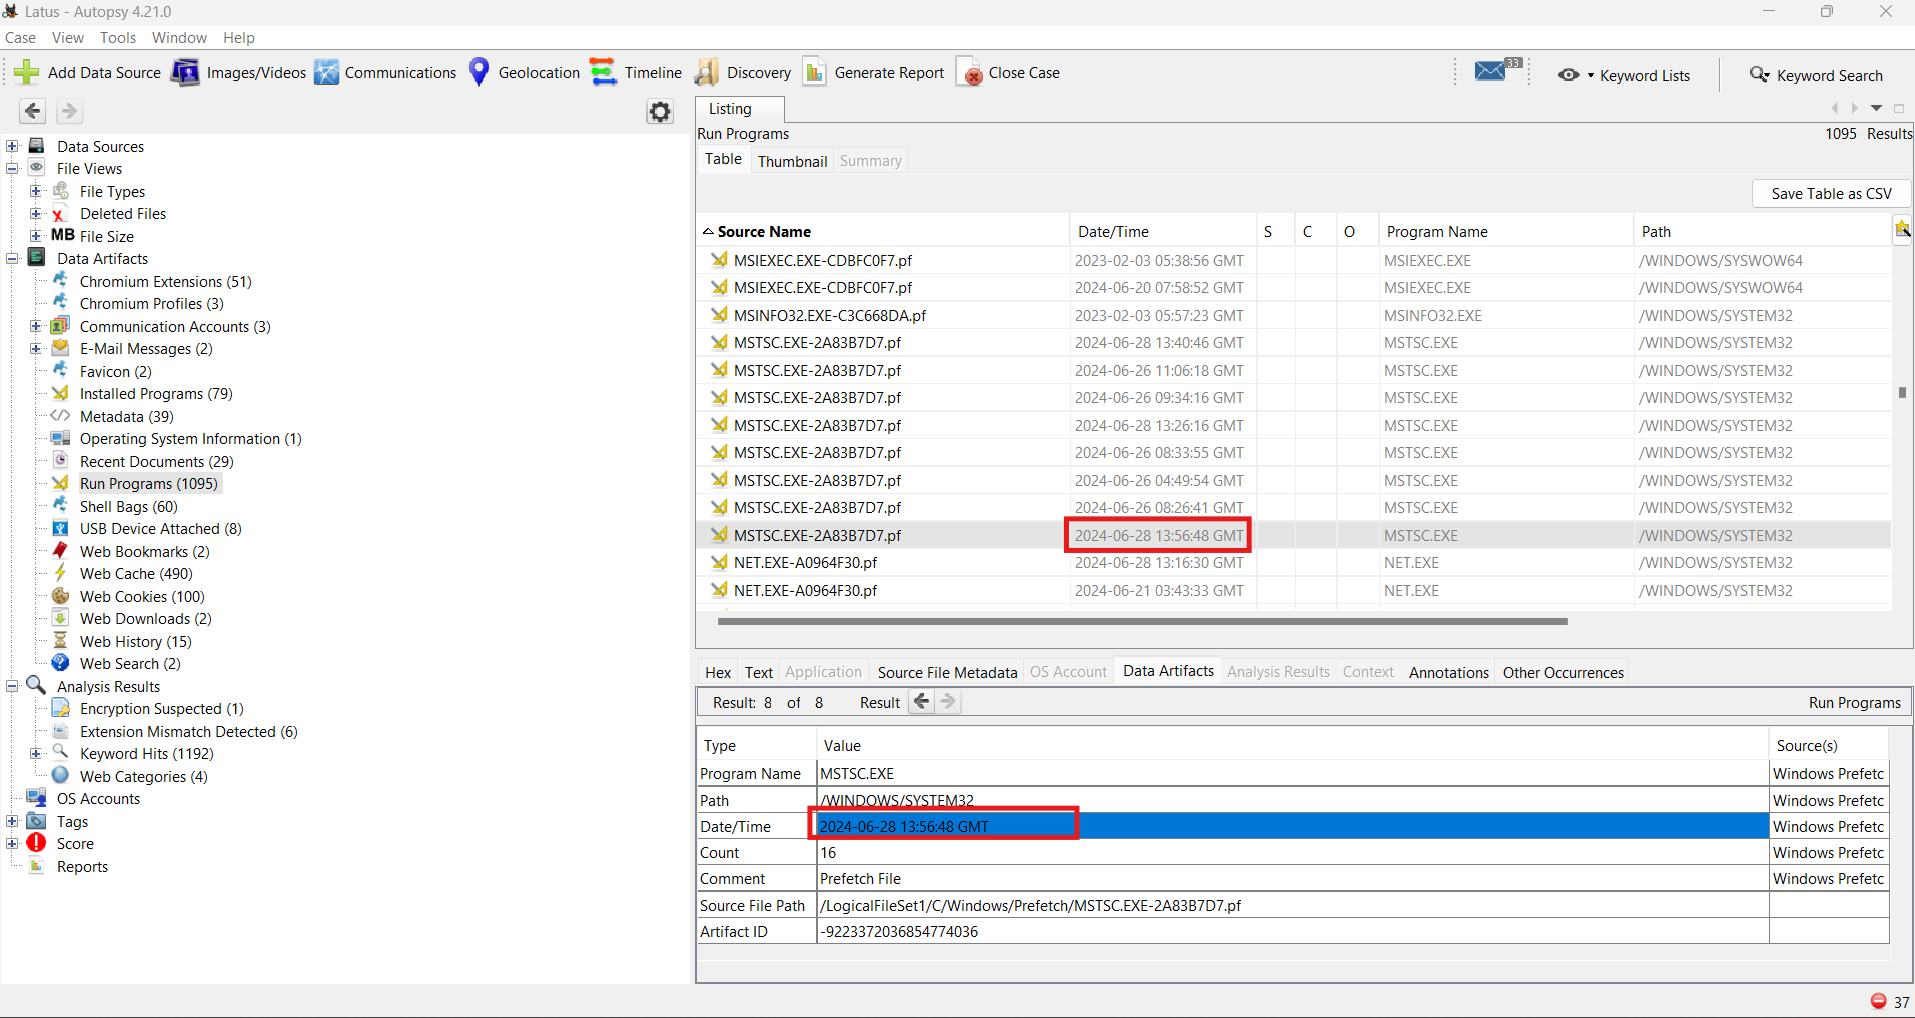
This result is correlated with the last-access time of the RDP config file for emman.t.
Task 7: When was the last time the Remote Desktop Connection application was terminated? (UTC)
For this one I headed back to the $MFT. I figured that an application’s .exe file might be last accessed at the time that it was terminated. Pursuing this, I searched the $MFT for mstsc.exe and looked at its last-accessed timestamp. It also should feasibly match up with the previous answer. That is, it shouldn’t be too much after 2024-06-28 HH:MM:SS.
We actually don’t find that specifically mstsc.exe has been has been accessed, near that time, but one of its resource files, mstsc.exe.mun was last accessed at 2024-06-28 HH:MM:SS few minutes after the last time that mstsc.exe was executed.

Now, I’ll be the first to admit that this answer is based on some shakey logic and guess work. I do not definitively know why it is that the timestamp associated with this particular instance mstsc.exe.mun in $MFT is the answer, and not the timestamp associated with mstsc.exe itself, or mstsc.exe.mui, or a different instance of mstsc.exe.mun, or another associated file. Again, if you have a definitive answer for why this is the correct answer, please let me know.
Task 8: How long did the penultimate RDP session last?
This question is looking for the duration of the second to last RDP session. What we really need here is a start time and an end time for the session. In my chronology of solving this CTF, this question was one of the last solved. There are a lot of different resources to look at and it’s hard to know which ones to focus on for definitive start and end times.
Solving Task 9 first is helpful. Solving it means that you have identified at least one method to find the ending timestamp of an RDP session. In fact, I think everything will make more sense if I take the writeup in that direction too. We will return to Task 8 after completing Task 9.
Task 9: When did the attacker disconnect the last Remote Desktop (RDP) session? (UTC)
So what would change when an RDP connection disconnects? At first, I expected it to be a credential, something similar to the credential being accessed in Task 5. But its not that. That makes sense right? Credentials are used to initiate a connection, not to terminate one.
Returning to some other files we found back in Task 5, we notice some interesting correlations between them.
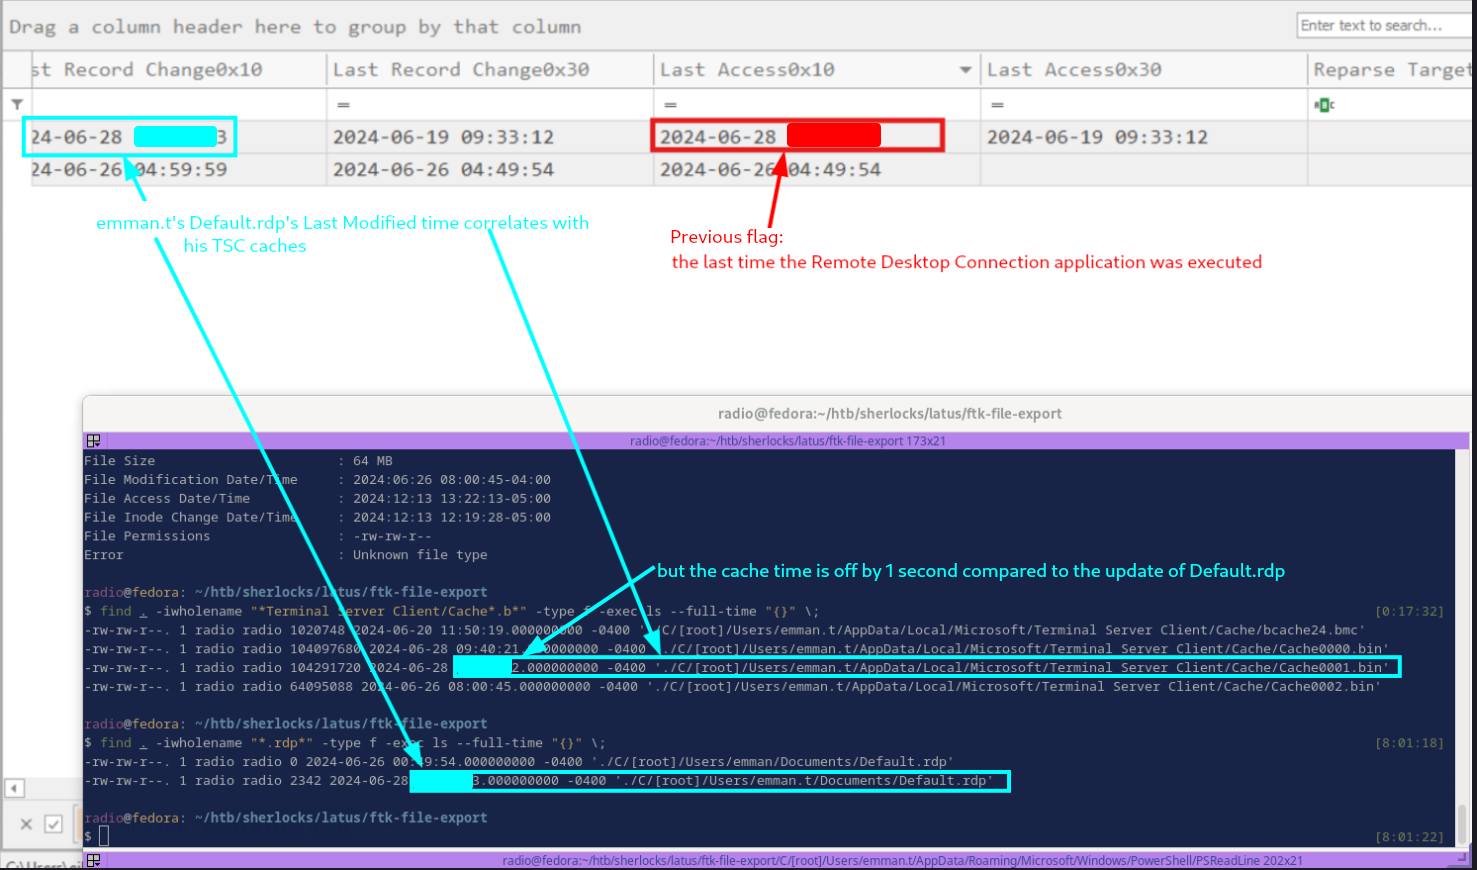
It turns out that the timestamp ending in 3, associated with Default.rdp is the correct answer. I am not sure if its standard for Default.rdp to be modified upon termination of an RDP session, though I don’t think it is. However, it does make sense that the cache associated with an RDP session, cache0001.bin in this case, would be last modified at the time the session was terminated. The fact that it is off by 1 second could be a rounding issue or simply due to a small discrepancy in the times that different processes occurred when the RDP session terminated.
Either way these times were correlated. Even though we can’t see other times that Default.rdp was modified, we now know that the last-modified time of a cache0000x.bin file was correlated with the end of a session within 1 second. We can go back and use this to help us solve Task 8.
Re: Task 8: How long did the penultimate RDP session last?
Based on Task 9, we’ll start with the idea that the session end time is the last-modified time of either cache0000.bin or cache0002.bin.

Considering that cache0002.bin was last modified on the 26th, we’ll go with cache0000.bin at 2024-06-28 13:40:21 (when converted to UTC) for the session end time.
What about the session start time? At first I went back to the credential files. They looked really promising as they were last accessed at 2024-06-28 13:33:21, making the session about 7 minutes long. Unfortunately none of the credentials’ timestamps worked to calculate the correct answer.
Next I went back to Autopsy and the execution times. Unfortunately, none of the execution times of mstsc.exe seemed to make sense. However, I did end up noticing a sort of interesting correlation.
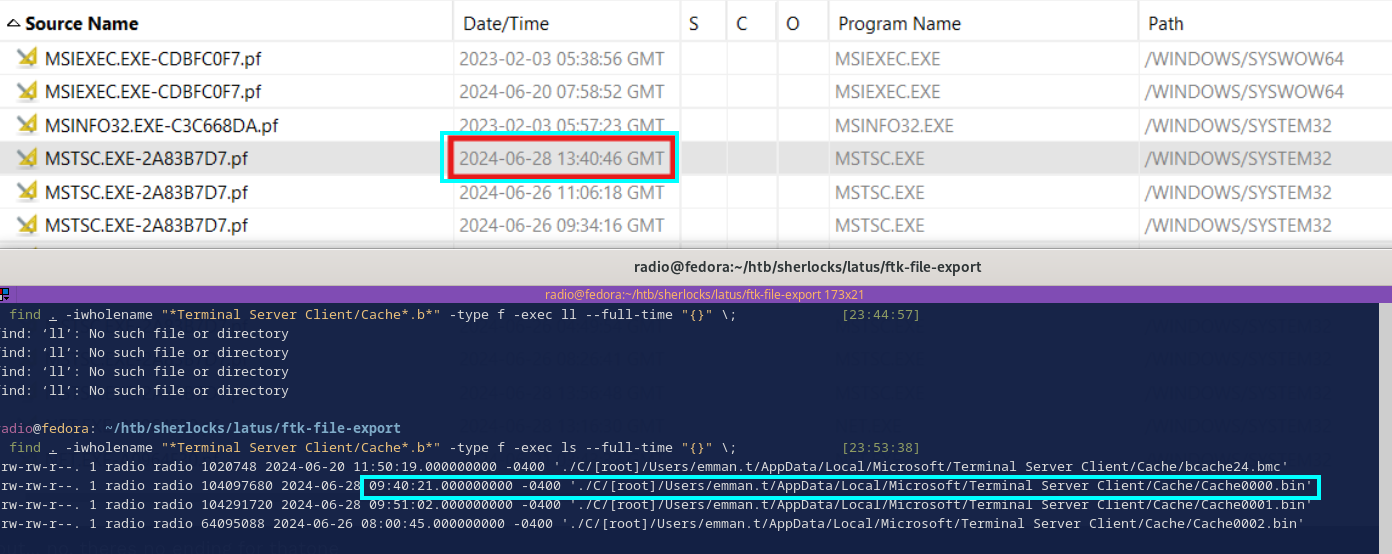
This shows an execution of mstsc.exe only about 25 seconds after our session end time. Perhaps this is the execution that precedes the final session from Task 9.
Unfortunately we are still lacking a session start time for Task 8. Honestly, around this point I looked at a lot of options to see where I could maybe get more sources of information, but not too much was available. The registry write times weren’t helpful, the USN Journal wasn’t available in the evidence, I had reconstructed the images stored in the caches for Task 11 so I searched through them to see if I could see any timestamps (see Task 11 for details on these images).
After a lot of searching I started just brute spraying any timestamps from $MFT of any files that seemed likely. I ended up hitting on the correct answer, but I don’t exactly understand why it is the correct answer. The timestamp for the session start time that ended up resulting in the correct answer was the last-access time of cach0002.
I wanted to corroborate this time with some other timestamps, so I searched for any timestamps on either side of the one that resulted in the right answer to see if anything else came close and made more sense, but nothing came up.
I do not know why the last-accessed time of an RDP cache marks the beginning of another. Perhaps when a session starts, the app accesses the last cache that it used to check if that cache can be used again for the new session.
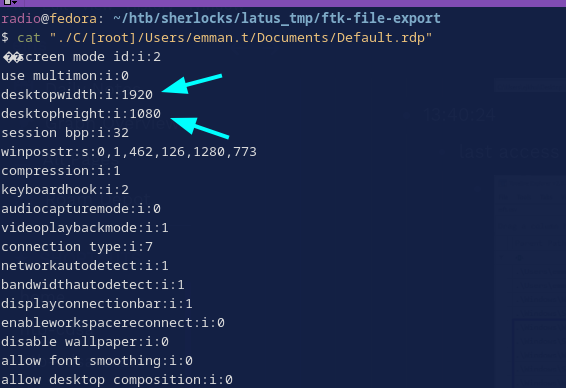
Task 10: What is the size of the remote desktop configured?
I had already noticed this value while examining emman.t’s Default.rdp.
Task 11: What tool did attacker use to discover the network after moving laterally to 192.168.70.133?
For this task, we need to find out what happened on a different machine, other than the one the evidence image is from. After some fumbling around trying to look at console history, etc. I found that RDP caches store images of static parts of the machine that is the server in the connection. This is to reduce the amount of information that has to be sent over the network during the session, but it also leaves traces of what was done during the RDP session.
I used this post by Ronald Craft as a guide for extracting images from the RDP cache. Per the instructions, I used BMC Tools for extraction and rdpieces for reconstruction. The reason that reconstruction is necessary is that initially BMC Tools generates a bunch of very small image tiles, each of which doesn’t show much. Rdpieces attempts to stitch these back together into coherent images. However, I didn’t find that rdpieces worked very well. It was somewhat better than all the individual tiles, but not very good.
It turns out though that BMC Tools’ option to create a collage of the times was the best way to get a look at all the images in the cache, at least for me. To do this, just use the -b option. BMC Tools outputs a lot of images, so I’d really suggest making an output dir for each cache you plan to extract from.
In general:
./bmc-tools.py -s cache_file.bin -d output_dir -b
What it looked like for me:
./bmc-tools/bmc-tools.py -s "./C/[root]/Users/emman.t/AppData/Local/Microsoft/Terminal Server Client/Cache/Cache0001.bin" -d cache0001 -b
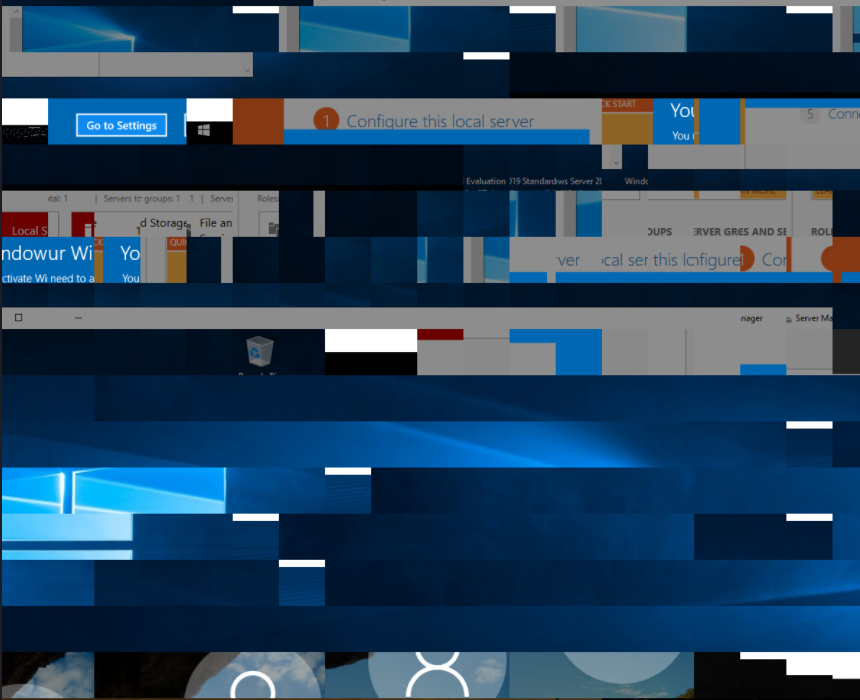
The image artifacts that result from this aren’t perfect, but they could contain interesting information. Here is part of one of the collages for example:
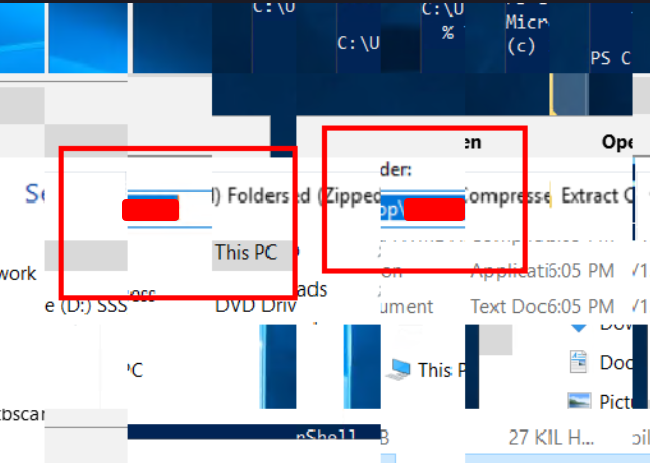
But which cache file should we look in? I looked at all of them, but there is a way to can figure out which one the answer should be in:
This question asks about the tool used after moving laterally to 192.168.70.133. In Task 9 we found that the last session ended at a time that is correlated with the last-modified time of emman.t’s Default.rdp. The IP listed in that Default.rdp is 192.168.70.133, meaning that the last session whose end-time we found was connecting to 192.168.70.133. Given that knowledge, to look for a tool used on 192.168.70.133 we should look at the cache file that was last modified around that same time. Considering the last-modified times of the 3 cache files, one should stand out.
After a lot of searching, I came across the name of the tool. It was clearly visible but broken into two parts.
Task 12: When was the event log deleted by the attacker? (UTC)
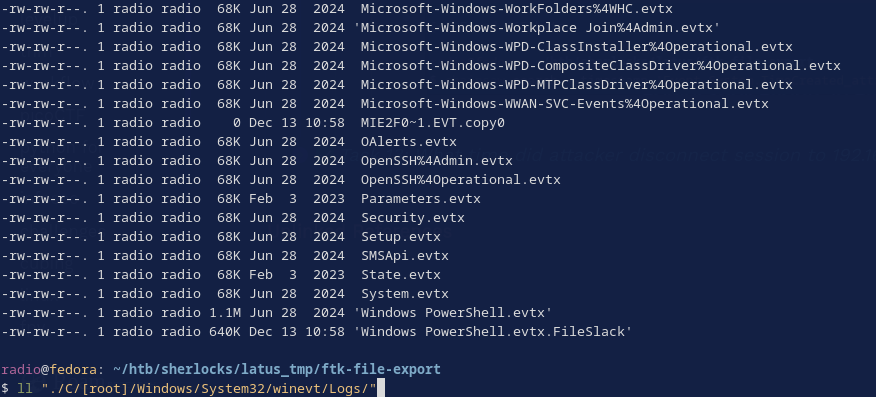
Now, the attacker didn’t actually delete all the logs. Checking in C:\Windows\System32\winevt\logs, we can see a bunch of log files. Though many of them are empty, indicated by 68k size, some of them are not.
The powershell logs looked interesting, I used Chainsaw to query all the logs that existed in the logs directory and search for the word “powershell” like this:
chainsaw search --timestamp 'Event.System.TimeCreated_attributes.SystemTime' --to "2024-06-28T23:59:59" --skip-errors "powershell" C/\[root\]/Windows/System32/winevt/Logs
I could have isolated the search to the powershell logs, but I was interested to see if anything else would come back. Either way, this worked. There were only a few results and they definitely contain evidence of log destruction.
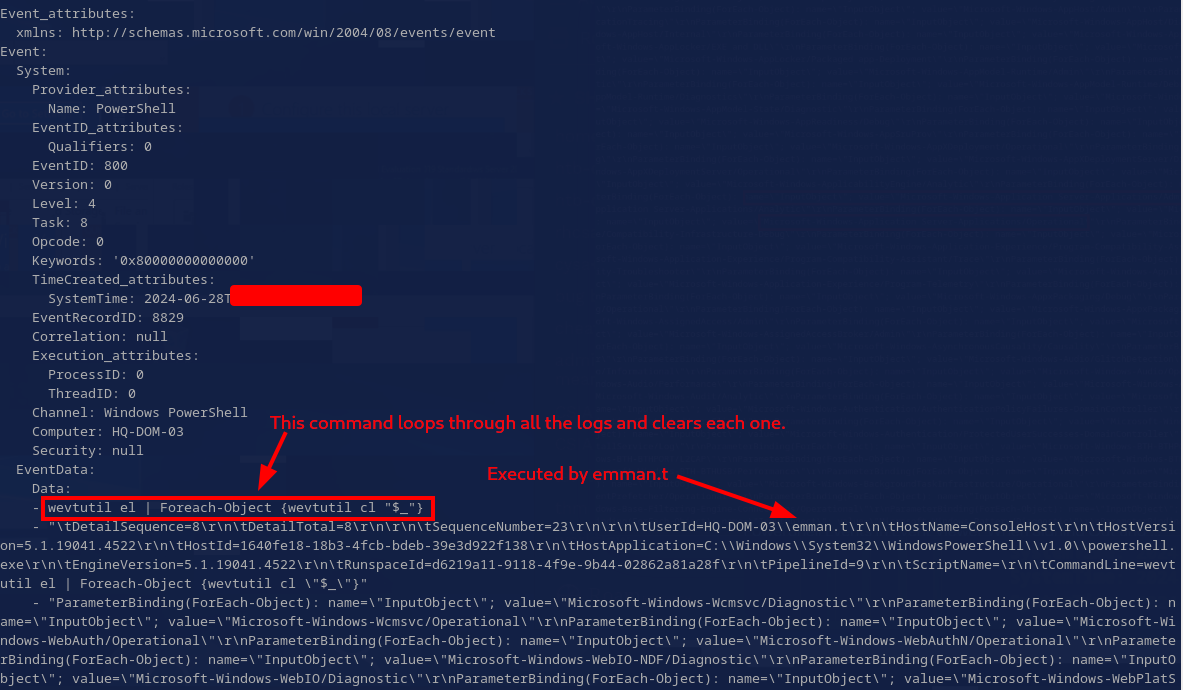
The log excerpt above shows a command designed to loop through the log files and clear each one using wevtutl.exe, a tool used for managing windows event logs.
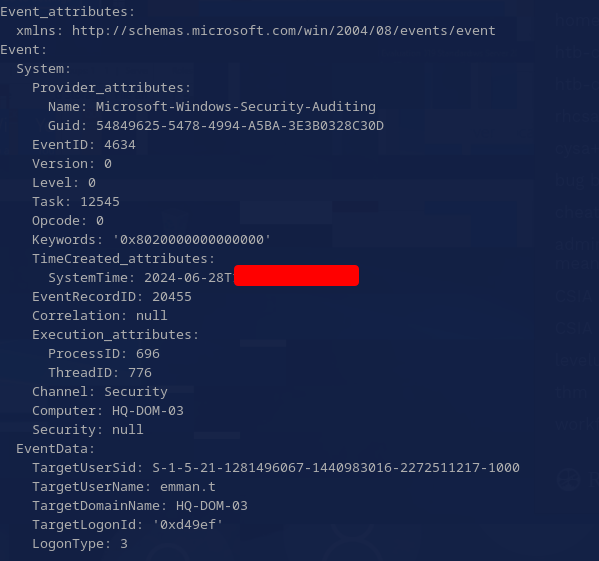
Task 13: What time did attacker disconnect session to 192.168.70.129? (UTC)
Well, which machine is 192.168.70.129? Grepping for that IP through all the files in evidence turns up only one result: C/[root]/Users/emman.t/AppData/Local/Microsoft/Edge/User Data/Default/Network/Network Persistent State. This is a config file for Edge and contains the IP as part of its QUIC config, indicating that 192.168.70.129 is actually the local IP of the machine that the evidence was collected from.
When did the attacker disconnect from this machine? Well, they must have disconnected after deleting the logs, so why not check the logs? I used chainsaw again to search for any logoff (event ID 4634) logs after the time the logs were deleted:
chainsaw search --timestamp 'Event.System.TimeCreated_attributes.SystemTime' --from "2024-06-27T14:03:25" --skip-errors "4634" C/\[root\]/Windows/System32/winevt/Logs
Six results are returned, but only 1 is a LogonType: 3 (network logon), while the others are type 2 (interactive). Assuming the attacker was logging on via network, I tried this timestamp and it was correct.
Conclusion
This was an unconventional Sherlock for sure, but in some really amazing ways. The (near) lack of logs often forced me to think outside the box to retrieve information that would have normally been available in one log or another. This meant I had to do a significant amount of research to solve some tasks. I ended up learning a lot–even some entirely new (to me) techniques like extracting image artifacts from RDP caches–and learning is always my end goal for doing Sherlocks, so I was quite pleased with that.
Another aspect of this Sherlock that I liked was that Task 5 (retrieving the credentials) requires the participants to take on the perspective of the attacker and use some offensive techniques in the name of forensics. It’s obvious that using offensive techniques to test defenses can help build better defenses, but it’s less obvious that directly using offensive techniques could be helpful in the investigation of an attack. I think this Sherlock does a great job highlighting the importance of being familiar with offensive skills no matter your role in cybersecurity.
All in all, I really enjoyed completing this challenge and I can’t wait for the next one!
Thanks for reading! If you have any questions or comments, feel free to reach out or follow me on X
Enjoy Reading This Article?
Here are some more articles you might like to read next: